The plank is a universal exercise loved by athletes and instructors. It is often talked about as an effective way to shape the press. In addition, the plank engages other muscles and increases the overall endurance of the body.
The plank can be done anywhere. All you need is a flat, clean surface the size of your body
The exercise is static in nature. The performer is in one position from 30 seconds to several minutes. The plank is suitable for those who want to make their body stronger. What muscles does this type of training strengthen?
- Press. To work out the abdomen from the front, the classic version with support on the forearms is suitable (Read also:). This puts maximum stress on the rectus muscle.

A six-pack press thanks to the plank is quite possible. If static is too boring for you, combine the bar and.
- Back and neck. The large muscles of the back work: the latissimus, rectus, quadratus lumborum, as well as the splenius neck muscle. This symmetrical load on the abdominal and back muscles forms correct posture and a toned stomach.

- Buttocks and legs. When performed correctly, the gluteal muscles are strongly compressed and experience greater stress. Also, the stance in this pose fully engages the front surface of the legs. For a more targeted workout for your legs and butt, try this.

- Arms and chest. A burning sensation in the shoulder area is felt from the first seconds. This is done by the deltoid and pectoralis major muscles.

It is also noteworthy that there are about 10 variations of the exercise that affect the muscles with different intensities.
Benefits of planks for men and women
This is a difficult exercise, even if it doesn't seem like it. It takes little time, but brings a lot of benefits. Anyone can master the technique. It can be used by athletes as part of a training program, and by untrained people who want to maintain tone or get in shape.
For men the bar is useful: 
- in the process of drying the body (static exercises are good for fat burning);
- to increase overall endurance;
- for the harmonious formation of the abs (the muscles of the back and abdomen are worked simultaneously);
- if you need to tighten your stomach;
- in combination with other exercises to maintain fitness.

After a few weeks of training, the 30 second plank will be performed with a smile.
Women In addition, they consider the bar to be an indispensable assistant:
- when fighting cellulite;
- for shaping the waist and athletic arms;
- to restore abdominal muscles after childbirth (not earlier than a month later, if the birth was without complications);
- for weight loss (if the exercise is used in combination with others and following a diet. Otherwise, the desired effect from the bar cannot be achieved, as from other exercises).
It is noteworthy that to achieve the effect, it is enough to systematically do the plank, alternating its variations. If done correctly and with full dedication, the result will be noticeable within two weeks.
When should you not do a plank?
For those who have never practiced the plank, it may seem like a harmless activity. However, an unprepared person can barely hold out in this position for half a minute. Therefore, before experimenting with health, it is important to familiarize yourself with contraindications to exercise.
- Pregnancy. Since the plank puts stress on the abdominal muscles, there is no need to practice the exercise during pregnancy. This will lead to serious complications, including miscarriage.

The only exercise option during pregnancy is the reverse plank. Belly up
- – a serious reason to limit physical activity, including this exercise. People who have or have recently undergone surgery for a hernia in the abdominal area should also refrain from taking it.

- and other types are a contraindication to performing the plank.

- , in which physical activity is prohibited.

In all these cases, you need to refuse to do the plank, as it is dangerous and can lead to irreversible consequences. Post-traumatic and post-operative recovery. When the body is ready for stress again can only be determined through medical procedures. If your doctor has given permission to engage in physical education, you must discuss an individual program with the instructor.
In the listed cases, the exercise is not contraindicated, but it is better to start with easier options, gradually complicating the task.
Achieve results, but not at the expense of your health
Thanks to the plank exercise, you can achieve impressive results. Follow our tips on the technique of performing this exercise, and within two to three weeks your toned body will be reflected in the mirror. And don't forget about contraindications.
Be sure to read about it

Plank exercises are aimed at strengthening Cortex muscles, which are responsible for stabilizing the pelvis, hips and spine. These are the abdominal muscles (anterior, lateral and deep), the lower back muscles and the pelvic muscles (buttocks, hip flexors and pelvic diaphragm muscles).
Thus, this original exercise is primarily designed to create a rigid muscular corset of the abdomen and hips.
In other words, the Plank will allow you to simply but effectively tighten problem areas, which are most often loose and thick.Classic exercise - straight front plank is isometric, that is, performed without moving the joints. Exercise is a great way to impact your waistline - get rid of your belly fat and reveal your six-pack abs.
The Planck exercise is often recommended as a therapeutic exercise to strengthen the back muscles (for example, after injury) and after childbirth (removes a flabby, saggy belly after pregnancy).
Technique for performing the plank exercise:
It consists of “hovering” above the floor for several minutes, leaning only on your arms and toes.
The feet should be together. This position of the feet complicates balance, and, consequently, the load on the abs and core muscles will increase.
Legs and buttocks should be kept straight and tense.The lower back must be straight while performing the plank. The stomach is inward and pulled towards the ribs. However, the retracted abdomen should not in any way affect breathing, which should be uniform. The elbows should not create excessive stress on the shoulders, and therefore are located exactly under the shoulder joints.Side plank.
Involves increased stress on the lateral abdominal muscles and shoulders
.With support on the elbow.

Supported by an outstretched arm.

The front or side Plank must be held for 30 seconds to 2 minutes.
If you cope with this task relatively easily, the exercise can and should be complicated.
There are a large number of Plank options with added dynamics. The effect of such dynamic exercises increases significantly compared to the classic straight Plank. To the static load, which is aimed at achieving elasticity and firmness of the flesh, aerobic exercise is added to combat fat deposits.
For clarity, all options for correctly performing Plank exercises are illustrated with animated photos - gifs.
Straight Leg Raise in Plank Position on outstretched arms - for the muscles of the back of the thigh, buttocks and abs. This exercise can also be performed using your elbows.

Combined exercise: Plank with arm extension and push-up.
Starting position - PLANK with outstretched arms (lying position). Perform push-ups and alternately raise your arms. Obviously, performing such an exercise is more difficult than classic push-ups.

Lowering onto the forearms.
Take a classic Plank position with your elbows supported. Raise your body to the top position using your arms. Pause at the top, then change the direction of movement and return to resting on your elbows.

Plank exercises with elastic band.

Walking in Plank position with straight arms.

Dynamic Side Plank
for the oblique abdominal muscles. An excellent exercise to combat fat deposits on the sides of the abdomen.

Side plank with twist
A more complicated version of the dynamic side plank for the oblique (lateral) abdominal muscles.

Plank exercise with knee bending outwards.
Take an emphasis lying on outstretched arms. Bring your right leg forward until your knee touches the elbow of your right hand, or as close to your right hand as you can. Watch your hips - they should not sag or go too high. Return your leg to the starting position and repeat on your left leg.

With the knee and elbow bent outward.

With the knee bent inward.
Jumping with legs raised in Plank position.
Take a plank position with your arms extended. Jump slightly, spreading your legs out to the sides. Make sure your upper body does not rotate. Then jump and return your legs to the starting position.
The same can be done in the classic Elbow Plank.
Dynamic performance of the Plank exercise using a Fitball.
A functional exercise that works all the muscles of the back and abs, forcing you to concentrate your attention as much as possible.
We place our legs below the knees, the closer to the toes, the more difficult it will be to maintain balance, and we stand in a stance (as for push-ups, with outstretched arms).
If you cannot lift yourself up with straight legs, bend your knees and perform the exercise with a small amplitude.

Plank with twist.
Another exercise to strengthen your waist.
Obviously, some of the exercises given here can only be performed by physically trained people. But almost anyone can hold the classic Plank for at least 10 seconds. And then more! You will still be surprised at the capabilities of your body!
Don't forget about Plank, and your body will become slimmer and more sculpted!
It's spring outside, which means we need to quickly get rid of the excess fat that has accumulated on the stomach over the winter and hone the muscle definition and contours of the figure. Under light clothing, a sleeveless T-shirt or a top, you cannot hide, alas, either your belly or the looseness of your muscles. A wonderful exercise that strengthens the abs, shoulder girdle and back is the plank.
In addition, the bar is simply good for maintaining the muscular-ligamentous corset in good shape. It maintains the elasticity of the back muscles and their tension. What could be the best way to prevent degenerative processes and the development of dangerous posterior protrusion - protrusion of part of the intervertebral disc into the spinal canal? Only exercises to stretch and strengthen the spinal erectors, which include the famous “plank” exercise.
The life-giving power of plank exercises
The rectifier muscle is the most powerful:
- It maintains the spine in the correct balanced position.
- Forms posture.
- With its help, the ribs move up and down when breathing.
By straightening and extending the back, the erector muscle simultaneously separates the vertebrae, which reduces pressure on the intervertebral disc. This contributes to an increase in disc height and regression of protrusion. The disc begins to restore its elastic properties not only due to reduced loads:
- Daily training of the erector muscles accelerates microcirculation in the paravertebral tissues.
- The nutrition of the disc, which receives the necessary amino acids and microelements, improves.
- The production of new chondrocytes begins - the cells that make up the hyaline cartilage of the disc.
This is the truly life-giving power of the simple plank exercise.
Development of the muscular frame with the plank exercise
This static exercise develops almost all large muscles of the body and fascia:

- Muscles of the shoulder girdle and upper limbs:
- pectoralis major;
- deltoid;
- supraspinatus and infraspinatus;
- two-headed and three-headed;
- shoulder
- Back muscles:
- trapezoidal;
- widest;
- diamond-shaped;
- thoracolumbar fascia.
- Abdominal muscles:
- oblique (external and internal);
- transverse;
- direct.
- Gluteal muscles.
- Quadriceps femoris muscle.
- Muscles of the back of the thighs.
- Triceps surae muscle, etc.
The plank exercise is available to both men and women and is widely practiced in yoga in a static version.
How to do the classic plank exercise
When performing a classic plank, the following conditions must be observed:

- Absolute evenness of the back - it should be perfectly flat (neither bending nor arching). Hence the name - plank.
- The legs are also always straight and in line with the spine.
- The spine and pelvis should be horizontal to the floor.
- The head, neck and shoulders are also on the same line.
- The position is held for 30 - 60 seconds.
- Support on the forearms or palms: the elbow joint is strictly in the same vertical plane with the shoulder joint.
This position is given by a lot of tension in all muscles, so it will not be possible to take the plank pose from the end. If you rush, you can injure yourself. The exercise requires little preparation.
Who is contraindicated for the plank?
The exercise cannot be done for dorsal lumbosacral hernias with compression of the nerve root or spinal cord, coxarthrosis, hip dysplasia, brachial arthrosis, spondylolisthesis and other serious pathologies of the spine.
Preparatory phase of the classic plank
- Get down on your knees and lean on your elbows, placing them parallel to each other at shoulder level.
- We hold our neck horizontally on the floor, stretching it forward.
- Raising your knee a little, slowly straighten your right leg, resting your toe on the floor.
- Straighten your left leg in the same way.
- Stay in the classic plank for a few seconds, then, lowering your knees one at a time, return to the starting position.
- In the same way, you can prepare a classic plank on your hands (with support on your palms).

Features of the classic plank
By observing the above conditions (horizontalness of the spine, pelvis, neck and head lines), you can gradually increase the time of performing the exercise to one minute.
- In a position with outstretched arms, it is easier to perform a plank due to the greater leverage (the role of the supporting lever is played by the hands).
- The wider your arms are, the easier it is, as the area of support increases.
- It is also easier to maintain the position by increasing the supporting area for the legs, that is, spreading the feet. The most difficult exercise to perform is with the feet connected.
This can be taken into account in the scheme of successively complicating the planks, starting from easier positions.
The classic bar can be supplemented with other elements:
- for example, lowering with outstretched arms onto the left or right thigh (twisting);
- making rotational movements of the hips, etc.
When performing all variations of the classic plank, you must ensure that there is no arching in your back.
Other types of planks
Single leg plank
- Take the position of a classic plank (at first it is better to place your hands wider).
- Move the left leg towards the midline of the body.
- Raise your right leg up and keep it straight as much as possible.
- Repeat the plank on your right leg.

Dynamic power option: alternate leg swings.
You can modify the simple leg raise by adding:
- circular rotation of the leg;
- moving it to the side (straight or bent);
- bringing the leg to the chest;
- bending and abducting the leg in the opposite direction.

One arm plank
- Take the previous classic pose, but increase the supporting area for the legs, placing the feet wider than the hip line, and, on the contrary, connect the hands in the middle.
- Maintaining balance with emphasis on your right arm, extend your left arm forward, to the side or raise it up.
- After staying in this position as long as possible, return to your previous position.
- Repeat with emphasis on your left hand.
The more preparation and better physical condition, the more dynamic the change of hands should be.

You can complicate the exercise by adding a rotation of the body towards the supporting hand, keeping the hips motionless.
You can also use a dumbbell for strength.
Plank on one arm and one leg
- Place your palms and feet wide apart.
- At the same time, extend your left arm forward horizontally and raise your right leg.

The exercise also has two options:
- Static - you need to stay in the main pose for as long as possible.
- Dynamic - fast movements with changes of arms and legs.
For those who have all kinds of pathologies with the spine, only static exercises are recommended.
Side plank
- Squat on your left thigh, leaning on your left elbow and straightening your legs.
- Raise your pelvis so that it is in line with your body.
- Place your right hand on your side, behind your head or stretch it up, and hold this static position within your strength.
- Lower your pelvis, returning to the starting position.
- Repeat the exercise on the right side.

The side plank can be complicated by adding:
- twisting elements, moving the raised hand under the opposite side;
- connecting the elbow of the raised arm with the knee of the upper leg, etc.
You can perform the exercise with support not on the foot, but on the knee.
Plank in yoga
There is a reverse plank, when the spine of the pelvis and legs are also straightened, but the emphasis on the palms or forearms is placed behind the body.
In yoga, this pose is called Purvottanasana.

Let's consider another interesting plank, often used in yoga - Chaturanga dandasana.
It resembles a classic plank supported on the palms, but here the arms are bent at the elbows and the body is strictly parallel to the floor. The pose is otherwise called the four-point plank. It is much more difficult to do.
And there is no limit to perfection. For physically trained people, it is possible to hold the body:
- on three points (on one hand and two feet);
- on two points (opposite arm and leg);
- on two points on the weight (only hands).

Plank and fitball
A fitball (large ball) is an ideal apparatus for such an exercise.
- The ball can be placed under the arms or legs and the angle of the torso relative to the floor surface can be changed.
- You can use a stability ball in a side plank position, holding it between your legs.
- By rolling the ball, you can exit the bar using different methods:
- bending and bringing the legs to the chest;
- lifting your pelvis up.

There are a great many varieties of planks. You can use your imagination and come up with your own exercises. It is necessary to combine the plank with stretching exercises, for example,
Summer is getting closer and issues of harmony are becoming more and more of a concern. I recently offered an effective complex for weight loss, I hope you are doing it. But for better results, it is advisable to do other exercises. For example, a plank, the benefits and harms of which will be discussed today, as well as how to do this exercise correctly, how often and how much, and whether it is effective for losing weight.
The plank is a physical exercise in which you need to stay in one position for some time, leaning only on your hands and toes. It is often included in training programs, although opinions about this exercise vary. There are reviews that it does not bring any benefit, but there is also the opposite opinion that the bar should be included in your complex, since when it is performed, more than 90% of all muscles work. So let's look at the effectiveness of this exercise.
We are all different, some can devote time and money to sports and constantly visit the gym or swimming pool. But some people can’t afford it, and it’s not even a matter of finances or laziness; sometimes there is a catastrophic lack of time for this.
The “plank” exercise is interesting because it does not require a special room, equipment or sportswear, and it does not require a lot of time.
The “bar” is also attractive because it has many varieties, from simple classic to quite complex options, therefore it is suitable for people with different physical fitness, both men and women. If you wish, you can create a whole set of exercises to work different muscle groups. 
Of course, if your goal is to have an ideal figure, then exercise alone is unlikely to achieve this. But even by devoting a minimum of time and doing a simple classic plank, you will improve not only your figure, but also strengthen the muscle corset that supports our spine, and this is very important, especially with a sedentary lifestyle.
Plank exercise - benefits and harm

The training can be dynamic (isotonic) and carried out with the help of movements, but you can train without doing any movements. Such training is called static (isometric).
During dynamics, the load on the muscles alternates, they either relax or tense; during static exercises, constant muscle tension occurs. Static exercises are considered strength exercises, they increase muscle tone, endurance of muscles and tendons, but they will not build muscle with their help. Dynamic exercises are suitable for this purpose.
The plank is the most popular static exercise with which you can work different muscle groups, including the transverse muscle. The transverse muscle holds our internal organs and if it is relaxed, it provokes the growth of the abdomen. In our usual abdominal exercises, this muscle works, but indirectly. The plank develops that part of the abs that is difficult to develop dynamically. This exercise also solves a number of other problems.
The benefits of exercise for men and women

In addition to the press bar, you can:
- strengthen the back muscles, which improves posture and is useful for osteochondrosis
- make your arms, legs, buttocks more toned
- fight cellulite by accelerating blood circulation and lymph flow
- reduce the risk of developing osteoporosis
- due to the stretching effect, relax stiff back muscles, relieve tension and pain in the shoulder region, which often bothers people who have sedentary work
- strengthen ligaments, tendons, joints
- speed up metabolism
- improve muscle coordination, vestibular system, developing a sense of equilibrium and balance.
The plank exercise is universal and suitable for both men and women. As I already said, static exercises do not contribute to muscle building and this fact is appreciated by women who want to have a toned figure, but not lose their femininity.
Men include this exercise in their complex due to the fact that it gives good results when drying the body, and also makes the muscles more resilient.
Plus a general health effect that is beneficial for both the female and male body.
Plank for weight loss - reviews and tips

Rita, 29 years old:
I gained a lot of weight after giving birth. I was looking for something that I could do at home and take a little time. The plank seemed like the best option to me. At first it was unbearable to stand in the pose for even 20 seconds. But it’s okay, I didn’t despair. A month has passed: I have lost weight (though I have reduced the amount of food I eat), and my arms have become more defined, and my hips and butt have tightened, and now I have no cellulite.
Svetlana, 35 years old:
I’ve been doing the plank for 20 days now, the result is zero, I’m disappointed. I’ll try for another 10 days, then I’ll give up if results don’t appear.
Ekaterina, 27 years old:
I’ve been doing the plank for two months now, and the results have simply amazed me. From 72 kg I dropped to 63 kg. The muscles began to tone, the buttocks noticeably tightened. I’m not going to quit, of course I limited my diet: a minimum of sweets and starchy foods.
Alina, 41 years old:
I can’t say that the bar has any effect on weight. I noticed this in myself after a couple of months of training. I wanted to lose a little weight, yes. But, apparently, such an exercise is not designed for such a result. However, it helps to get a trim waist, which is a very nice fact. Maybe if you increase the time you do the exercise, you will be able to lose weight. But, in principle, I am satisfied with what I have achieved – a flat stomach.
Natalya, 52 years old:
The “our everything” bar is maximum results with minimum costs. Arms are toned, beautiful abs, no “breeches”. I stand for 3 minutes every day.
I gave as an example several reviews about the effectiveness of the “bar” for weight loss, there are actually a lot of them and they are very different. Some people write rave reviews and consider it a super tool for weight loss, but there are also completely opposite opinions.
What is the reason for such different reviews about this exercise? I decided to find out what experts had to say about this, but even here opinions were divided.
Some say this:
Static loads, which are carried out without much strain or, so to speak, half-heartedly, are produced due to the work of red muscle fibers, which are an excellent tool for obtaining energy from fat deposits. Thus, if your main goal of training is weight loss, then static exercises with light loads are the ideal solution to your problems.
But there is also this opinion:
The plank strengthens muscles, works the core, improves the tone of the hips, buttocks, arms and shoulders, but the plank is not an effective exercise for burning fat and losing weight. This exercise is designed to tone muscles, not burn fat.
But experts are unanimous on one thing:
The plank and its modifications are a great way to strengthen the body and get rid of sagging, but to lose weight, dietary restrictions are required.
From the above, the conclusion suggests itself, the problem cannot be solved with just one bar, and other exercises, you need to approach the issue of losing weight in a comprehensive manner.
In order for the effect of the bar to be as quick and noticeable as possible, you must adhere to a number of rules:

As experts say, by following the above rules, it is quite possible to adjust your weight in a month, but, of course, you will not be able to remove 20 kilograms. How much exactly depends on other factors, such as the physiological characteristics of your body, age, and how correctly the exercises are performed.
In addition, watch the video, it tells you how to use the plank exercise for weight loss.
Contraindications and harm from exercise
We have found out everything about the benefits, but before including the bar in your set of exercises, it is important to know whether it has contraindications, so as not to harm your health.
The first thing that is important to know is that a constantly tense muscle under static load compresses the blood vessels and, accordingly, its blood supply deteriorates. By pushing blood into a tense muscle, the heart muscle has to work hard, and accordingly the load on the heart and blood vessels increases and, as a result, blood pressure can rise sharply and even cause a heart attack. Therefore, people prone to high blood pressure and having heart and vascular diseases need to be extremely careful. The exercise can be done, but experts recommend that such people stay in the plank position for no more than 2 minutes and it would be a good idea to consult your doctor.
During exacerbation of chronic diseases, colds and flu, it is better to postpone classes until better times.
You cannot do a plank in the following cases:
- pregnancy
- abdominal hernia, intervertebral hernia
- diseases of internal organs for which physical activity is prohibited
- pinched nerves, injuries to the spine, arms, legs
- joint diseases
You can do the plank, but with caution, starting with lighter options and only after consulting a doctor:
- in the postpartum period, especially during complicated labor and caesarean section
- during the recovery period after injuries and operations.
For overweight people, in order not to harm the spine and reduce the load on the joints, it is recommended to do the plank while standing on your knees, and not on the tips of your toes. 
It is important to ensure that the exercise is performed correctly so that your back is straight and does not sag. Improper execution will make the exercise useless, but this is not the worst thing. Improper execution can lead to disc displacement and cause pain in the lower back, neck and shoulder joints.
How to do a plank correctly
Static exercises have a disadvantage - muscles that are not regularly stretched lose flexibility over time. If the plank is an additional exercise to the dynamic complex, then it is better to do it after the main exercises. If you only practice the plank, then before the load you need to do a warm-up, which should include stretching exercises.
You can do the exercise at any time of the day, even after eating.
So that your feet don’t slip when performing the exercise and you can keep your body in a horizontal position, it’s better to do the plank in sports shoes. 
You need to start getting acquainted with this exercise with the usual classic plank and it is performed as follows:
- The body should form a single line from the top of the head to the heels, the back is straight, it cannot be bent either up or down. The buttocks should also not rise or fall
- The gaze is directed to the floor; it is considered a mistake to raise the head, as this puts additional stress on the cervical vertebrae
- You stand on your toes with your feet together. There is a lightweight option when your feet are shoulder-width apart, this makes it easier to maintain balance.
- The arms are bent at the elbows at an angle of 90 degrees and are directly under the shoulders. The wrists are parallel to the elbows. It is considered a mistake when the palms are clasped in front of you or when the hand is turned around and the flat palm is placed on the floor
- The muscles of the abs, hips, buttocks are tense. Try to evenly distribute the load on your arms and legs
- Breathing freely, without delays
You need to stand in this position for at least 20 seconds. If during the exercise a slight burning sensation appears in the muscles, do not be alarmed, it means you are doing everything correctly.
Increase the time spent in the plank gradually; it is better to do it efficiently, but in less time than vice versa. The body must get used to such a load.
In the video you will clearly see what errors can occur when performing the exercise.
Variations on the plank theme - different techniques, photos, videos
If the classic plank seems like a very simple exercise to you, then you can increase the load using different execution techniques. See photos, videos, choose the option you like.
Plank on extended arms

Plank with feet supported on a fitball (bench) on straight arms 
Bent arm side plank 
Side plank at arm's length 
Side plank with straight leg raise 
Side plank with bent leg raise 
Plank leg raises 
Stretch your arm forward while lifting the opposite leg 
Reverse plank on bent arms 
Reverse plank on straight arms 
Reverse plank with leg raise 
Climber plank (leg to chest curl) 
Dumbbell plank row 
I don’t know about you, it all seems very difficult to me, I’m only doing the classic plank for now. But the video confirms that it is possible to do the plank in different variations, so there is something to strive for.
To summarize, we can say that now knowing all the pros and cons of the plank exercise, feel free to move from the computer to the mat, this is a great way to work on your body.
To help you, led by Doctor of Biological Sciences, the best expert in the field of weight loss - Galina Nikolaevna Grossmann. Using her method, many hundreds of thousands of women have already lost weight and, most importantly, the lost kilograms do not return to them even after six months or even several years! Get the course via the link while it is freely available.
I wish you beauty, slimness and health.
Elena Kasatova. See you by the fireplace.
Few people like the plank. More often than not, you end up staring at the timer for a full minute (or longer), counting down the seconds. Being a basic isometric exercise, it strengthens the whole body, and we will tell you how to properly do the plank for weight loss at home, so that the abs on the abdomen and core muscles become more pronounced, the lower back is strengthened and the shoulders are pumped up.
In addition, you do not need additional equipment, and the intensity of the exercise can be adjusted independently by expanding the position of your arms and legs and resting your hands on the floor instead of your elbows and forearms. Look at yourself. Check out Certified Strength and Conditioning Specialist Keith Scott's tips for mastering the plank technique to lose belly fat and get a toned body.
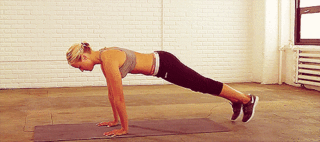
To perform a standard plank, also called a front plank, start by lying face down on the floor. Now bend your elbows at a 90-degree angle, placing your weight on your forearms. Place your elbows and forearms on the floor directly below your shoulders, and lift yourself up so that your weight is distributed between your feet and forearms, and your body forms one straight line from the top of your head to your feet. Squeeze your abdominal muscles to maintain a straight body position. Hold this position as long as you can. Your goal is to stay in this pose for two minutes.
"The plank helps build strength in your core, shoulders, arms, and glutes," says Scott. This makes the plank an excellent tool for lifting heavy weights and participating in intense sports. Even if you don’t even move or lift weights, you have to constantly squeeze your abs to hold the pose - most people cannot stand for 30 seconds the first time.
How to hold a plank longer
The longer you are able to stay in a standing position, the less vulnerable your lower back becomes to injury, and the more defined your abs look due to the reduction in the fat layer above them. To do this, you need to perform plank exercises correctly, follow these tips to extend the exercise time and strengthen your muscles.
- Practice: Hold the stance several times a day, trying to hold it a little longer each time.
- Do bodyweight exercises: Push-ups and pull-ups will strengthen your core muscles.
- Squats and Deadlifts: Those who are fairly strong at these exercises have no problem with the plank.
Hold on
If your core muscles are still too weak to perform a standard plank, you can strengthen them with a kneeling variation. When you can hold the plank for more than two minutes without any problems, move on to more advanced variations.
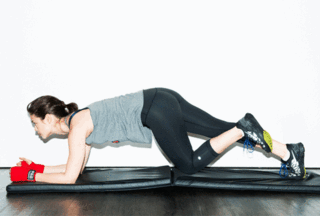
- Raise one leg. Simply lifting one leg off the floor enormously increases the load on the core, causing it to resist the natural rotation of the body.
- Raise one hand. Likewise, your body will want to roll over to one side. Fight it.
- Take a fitball. By resting your forearms on the exercise ball, you will have to stabilize your body while preventing the ball from rolling away.
Does planking burn belly fat?

The bad news is that plank pose is one of the hardest exercises to add to your workout routine. But on the other hand, you will actively burn calories while performing this treacherous exercise. Planks fit perfectly into any training program, whether you work out in the gym or at home. In just a couple of seconds you will feel that the exercise is working. Below we will tell you whether you can lose weight by doing the exercise at home and how to do it correctly for maximum results.
Burning calories
Your body continuously burns calories at a slow pace regardless of your activity level. But during heavy exercises like planking, the rate of calorie burning increases. According to the FitClick website, a person weighing 68 kg will spend 221 kcal per hour of planking. Given that you are unlikely to plank for hours, you can calculate the number of calories burned over shorter periods. If you weigh 68kg, planking will help you burn three to four calories per minute.
Working muscles
Similar to all kinds of crunches, planks effectively load the abdominal muscles. Despite the narrow focus of this exercise, it requires the contraction of a number of other muscles while holding the position: the obliques, hip flexors, quadriceps, pectoral muscles, and many of the smaller leg muscles. Planks are a great workout for your core muscles.
Fat burning
Exercise is the main way to burn calories for weight loss. However, despite all the advantages of planks, they cannot be called the most effective exercises for getting rid of excess fat. To lose weight and lose a pound of fat, you will need to burn on average 3500 kcal more than you consume. Considering the relatively small amount of calories expended during planks, jogging or dancing will allow you to achieve better fat loss results.
Basic plank variations for beginners
The plank is undoubtedly one of the best ways to test your core strength. But, unfortunately, this exercise can quickly become boring.
However, with the help of some simple tricks, you can turn the modest plank into a whole set of new complex exercises that will finally allow you to see the coveted six-pack abs.
Select a few variations to immediately incorporate into your workout routine.
1. Standard
Also known as the "trooper stance".
2. Elbow plank
The same as a standard plank, only with emphasis on the forearms.
3. One-arm stand
It disrupts the balance of the body, stimulating the active work of the core muscles.
4. Single leg plank
A great way to identify core muscle imbalances while targeting your glutes.
It engages not only the abs, but also the obliques and shoulders.
6. Side plank with twist
Balance training and improving muscle tone throughout the body, especially the shoulders.
7. Shoulder Touch Plank
Complements the standard plank by working the upper body. (Try to keep your body motionless, do not sway to the sides).
8. Rocking bar
Works the shoulders and back along with the core, glutes, hamstrings and calves. This is also a great method for practicing the planche plank.
9. Toe Touching
Develops hip flexibility and core and upper body stability.
10. With a wide stance of arms and legs
An ultra-difficult variation of the standard plank. Test how long you can hold it and how wide you can spread your legs and arms.
11. Worm
Activates your abdominal muscles in a similar way to the ab roller exercise while testing the flexibility of your hips. Try not to bend your back too much when leaning forward.
12. Planche plank
A simplified variation of the planche (horizontal), a classic gymnastic exercise to test the isometric strength of the overall body musculature. This is a real test of shoulder mobility and upper body muscle strength.
13. The best exercise for effective fat burning and posture correction

Nowadays, extreme methods of getting rid of excess fat, such as immersing in an ice bath, are in fashion. But fat burning doesn't have to be so painful. In fact, even simple exercises like the reverse plank are great for burning fat effectively. But the reverse plank not only stimulates fat burning, but also corrects posture. This exercise is very easy to learn: just follow the steps below and watch the video on doing the reverse plank.

A certified physical therapist outlines the following steps for achieving ideal reverse plank form:
- Sit on the floor with your legs straight in front of you.
- Place your palms with your fingers spread on the floor at your sides near your hips, slightly behind you.
- Press into your palms and lift your hips and torso up toward the ceiling.
- The gaze is directed to the ceiling, socks are pulled up, legs and arms are straight.
- Tighten your entire body, stretching it in a straight line from head to toe.
- Squeeze your core muscles and try to pull your belly button in, bringing it closer to your spine.
- If your hips sag or drop down, lower yourself to the floor.
Try the reverse plank variations shown in the video below.
Advantages
Dr. Mercola highlights the following beneficial properties of this exercise:
- Trained core muscles - the plank will strengthen the deep core muscles.
- Elimination of back pain - the plank strengthens the muscles of the back, especially the upper part. There is also a direct correlation between strengthening your core muscles and reducing back pain.
- Flexibility – The muscles surrounding the shoulders, collarbones and shoulder blades stretch and lengthen when doing planks, becoming more flexible.
- Improved balance and posture - the plank works all the muscles responsible for maintaining correct body position, such as the muscles of the back, shoulders, abs and neck. By adding a plank to your daily exercise list, you will begin to stand straighter.
What to avoid when doing the exercise
As already mentioned, proper technique is very important, especially when it comes to planks. Dr. Mercola gives the following recommendations for doing planks:
- If you suffer from back pain or any other injury, be very careful with these exercises - start gradually.
- Beginners are advised to first hold the plank for a few seconds to get used to the exercise. Then the load can be increased.
- Make sure your head, shoulders and hips don't sink in.
- The hands should not be too close to each other - this will cause internal rotation of the shoulders and instability of the joints.
- Don't hold your breath.
- You should also not stay in any plank position for too long.
This exercise variation will improve your body in ways you never expected. But you need to make sure your technique is correct, otherwise you will do more harm than good.
Set of planks for cube abs
Whether you're a busy person on your feet all the time, or don't have time to go to the gym, bodyweight exercises will help you get into the shape you want.
*Add 3-5 rounds of this sequence at the end of your regular workout. Rest as much as necessary between sets.
Set of exercises:
- Plank stand, 3 seconds
- Plank with simultaneous straightening of arms, 3 repetitions
- Walking plank, 3 reps
- Plank stand, 3 seconds
- Alternating Shoulder Touch Plank, 3 reps on each side
- Alternating side plank, 3 reps on each side
* During the entire complex, squeeze your core muscles, maintaining a neutral spine position.
Selection of planks for reinforced concrete core
These variations will completely exhaust your abs and strengthen your core.
- Duration – 30-45
- Exercises – 4
- Equipment – not required
You'll start with a standard plank before moving on to three variations to tone your abs—the rocker plank, the wide-stance plank, and the side plank. Each variation of the exercise is aimed at working out specific areas of the abdomen, but all four types of planks together will give you an intense burning sensation throughout the central part of your body.
Instructions
Perform these exercises in a circle, that is, one after another without rest. After finishing all exercises, rest for 30 seconds. Repeat the entire complex 5-10 times.
Depending on your athletic ability, you can shorten or extend your rest time. You can also do more or fewer circles.
A complete archive of our daily short workouts is available at mensfitness.com/todaysworkout.
Plank program (5-10 laps)
| Exercise 1
Plank What you need: no equipment |
 |
--
approaches |
20 seconds repetitions |
-- |
| Exercise 2
Rocking bar What you need: no equipment |
 |
--
approaches |
20 seconds repetitions |
-- |
| Exercise 3
Plank with wide arms and legs What you need: no equipment |
 |
--
approaches |
20 seconds repetitions |
-- |
| Exercise 4
What you need: no equipment |
 |
--
approaches |
20 seconds repetitions |
30 seconds |
Lose Weight with the 30-Day Fat Burning Plank Challenge

The proposed 30-day fat-burning plank program will speed up your weight loss process tenfold, taking just a couple of minutes a day.
If you are just at the very beginning of your weight loss journey and have already heard about the plank, congratulations - you are more knowledgeable than I was when I was a beginner!
As I said before, until I started my journey into the world of sports a couple of years ago, I was not familiar with training and different exercises.
I first encountered planks while doing my first Beachbody exercise routine, P90X. I quickly realized how many muscle groups the plank uses.
The planks are extremely varied. All the variety of variations of planks will help beginners strengthen their muscles, and the most trained athletes will receive an adequate load.
Using this 30-day fat-burning plank program, you can train your core muscles, including the back muscles that are most important for our 40-year-old bodies.
In women over 40, core muscles often weaken over time. This can be seen from the saggy, flabby belly.
The back is often injured when doing housework if the core muscles are not trained.
This is where the 30-Day Fat Burning Plank Challenge comes into play. The only exercise that takes just a couple of minutes a day will improve the condition of your core muscles, reduce the risk of injury, speed up your metabolism and lose excess fat.
How to do a plank correctly - execution technique

In order for the 30-day fat-burning plank program to produce results, it is very important to make sure that you perform the exercise correctly.
The photo below shows the correct position of the standard bar. It is necessary to adhere to this position to prevent injury and ensure maximum effectiveness of the exercise.
If you are not yet able to do a full plank, you can lower your knees and/or elbows to the floor, following the basic principles of elbows under shoulders, core engagement, hip alignment, and neutral head/neck position.
30-Day Plank Plan for Weight Loss
This table is compiled specifically for training beginners. If you already have a fairly high level of training and this complex will be easy for you, then you can start classes from day 10 and then independently increase the time you perform the exercise.
- Day 1: 15 sec.
- Day 2: 15 sec
- Day 3: 15 sec
- Day 4: 20 sec.
- Day 5: 20 sec.
- Day 6: 25 sec.
- Day 7: 25 sec.
- Day 8: 25 sec.
- Day 9: 30 sec.
- Day 10: 30 sec.
- Day 11: 30 sec.
- Day 12: 35 sec.
- Day 13: 35 sec.
- Day 14: 35 sec.
- Day 15: 40 sec.
- Day 16: 40 sec.
- Day 17: 45 sec.
- Day 18: 45 sec.
- Day 19: 50 sec.
- Day 20: 50 sec.
- Day 21: 55 sec.
- Day 22: 55 sec.
- Day 23: 55 sec.
- Day 24: 60 sec.
- Day 25: 60 sec.
- Day 26: 60 sec.
- Day 27: 65 sec.
- Day 28: 65 sec.
- Day 29: 70 sec.
- Day 30: As long as you can!
This 30-day plank challenge is a great first step on your fitness journey. After 30 days of planking, your strength will increase and your metabolism will speed up.
Additional sets of exercises will help further improve the overall tone of your body.