Push-ups are a bodyweight strength exercise that are key to developing upper body muscles. Regularly performing push-ups not only increases your endurance and strengthens individual muscle groups, but also Helps tone the entire body.
Do you want to learn how to do push-ups, are you looking for a ready-made diagram and the correct push-up technique? Or just want to know about the effectiveness of this exercise? We offer you the most complete guide to push-ups in one article, as well as step-by-step instructions on how to learn push-ups from scratch.
Push-ups: how to do them correctly
Push-ups are the most popular bodyweight exercise. It is used not only in strength training, but also in plyometric exercises, CrossFit, Pilates, callanetics and even yoga. And so versatility of push-ups easy to explain. Push-ups help you engage every muscle group from your neck to your toes, and especially strengthen your pectoral muscles, shoulder girdle, triceps, and abs.
There are many different types of push-ups, but before moving on to more complex modifications of this exercise, let's understand the technique of performing classic push-ups. The correct form of exercise is not only the maximum result and high-quality muscle work, but also reduced risk of injury and damage during classes.

Correct technique during classic push-ups:
- The body forms a straight line, the pelvis does not go up and does not bend down.
- The abdominal muscles are tense, but breathing is not held.
- The head is in a neutral position, not looking down, but not lifting up either.
- The palms are strictly under the shoulders and do not go forward.
- Palms face forward, parallel to each other.
- The elbows are turned back 45 degrees, they are not spread out to the side.
- As you exhale, bend your elbows and lower your body parallel to the floor, maintaining a straight line of your body.
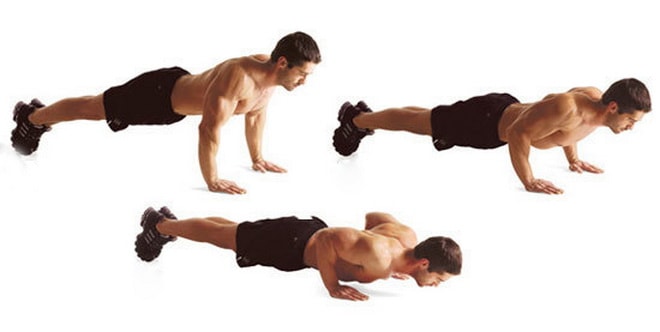
- Push-ups are performed with full amplitude, i.e. the body drops as low as possible. Elbows should form a right angle.
It is this technique of classic push-ups that helps to evenly work the muscles of the shoulders, chest and triceps.
Push-ups work several muscle groups at once. This exercise allows you to work all the muscles of the shoulder girdle and the small stabilizing muscles of the shoulder. Also push-ups from the floor and from the knees develop strength and elasticity of the shoulder muscles, which is especially important since the shoulder joint is extremely unstable and susceptible to displacement and injury.

Push-ups help work the following muscle groups:
- Pectoralis major muscle
- Deltoids (shoulders)
- Triceps
- Serratus anterior muscle
- Abdominal muscles
In addition, during push-ups, the muscles of the legs, buttocks and back are indirectly involved in the work. Push-ups also increase functional strength necessary to perform regularly performed actions (lifting and moving objects, cleaning the house, holding a child in your arms).

The main mistakes in the technique of classic push-ups
Push-ups are not as simple an exercise as it seems at first glance. Errors in technique are made not only by practitioners, but even by coaches! Improperly performing push-ups can lead to injuries to the wrists, shoulder and elbow joints, as well as pain in the neck, back and lower back. If you can't maintain proper form during push-ups, drop to your knees or reduce the number of reps! Train yourself to do this exercise correctly from the very first time you do it.
The most common mistake in push-up technique is the position of the elbows relative to the body. Keeping your elbows out helps compensate for lack of upper body strength. Of course, you can do this version of push-ups (which many people do). But the problem is that this method of execution increases risk of shoulder and elbow injuries. Therefore, it is better to pay attention to the position of the elbows: they should be turned back 45 degrees, and not look in different directions.


In classic push-ups, your hands should be strictly under the shoulders. Some practitioners practice push-ups with wide arms, but this is a weaker position in which your muscles do not work well enough. Additionally, wide-arm push-ups can cause shoulder pain over time.

During push-ups, the body should form a straight line. But if you have a weak core, then there is a risk of poor push-up technique: lifting your butt up or, conversely, arching your lower back and lowering your hips towards the floor. Incorrect body position will excess stress on the spine. To avoid this mistake, start practicing the plank exercise - this will help strengthen your muscle corset. We recommend reading: Plank – benefits and harm, 45 options for planks + training plan.

A very common mistake in the push-up technique is performing the exercise with incomplete amplitude, namely, not lowering the body down enough. Naturally, at first it will be difficult for you to perform push-ups with the full range, but train yourself from the very beginning of practical training lower the body to a right angle at the elbow.

For example, let's visually compare the correct and incorrect performance of push-ups.
1. Correct classic push-up:
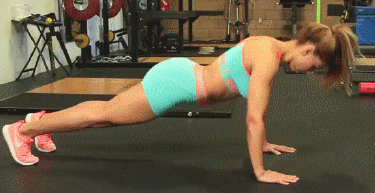
The body forms a straight line, the pelvis does not rise up, the lower back does not bend. When doing push-ups, the body lowers low, the elbows are quite close to the body, the palms are under the shoulders.
2. Correct knee push-ups (simplified version of classic push-ups):

Similarly, the body forms a straight line, there are no deflections or bends in the back. We pay attention to the correct position of the palms relative to the shoulders.
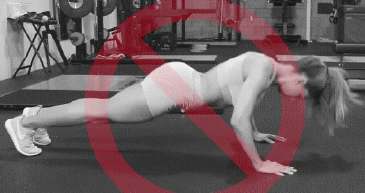
3. Push-ups with an error:

The pelvis is lowered down, the lower back is curved, the straight line of the body is broken. Doing this exercise can cause back pain and even injury.
4. Push-ups with an error:
In this picture we see insufficient lowering of the body, the elbows barely bend. It is better to do 5 high-quality push-ups than 15-20 poor-quality ones, where the arms do not form a right angle.
Thanks to the YouTube channel for the visual gifs Lais DeLeon.
Push-ups: benefits, harm and contraindications
Like any other exercise, push-ups have a number of advantages and disadvantages, as well as contraindications for execution. This is an excellent strength exercise for muscle development, but if performed incorrectly or with weak joints, it can have unpleasant health consequences .

Benefits of doing push-ups:
1. Push-ups are the best exercise for strengthening chest muscles with your own body weight. If you want to get a good workout on your pectoral muscles, then push-ups should definitely be included in your training plan.
2. Push-ups are a multi-purpose exercise that work all at once. several muscle groups . In addition to your chest, you'll strengthen your triceps, shoulders, and core. Push-ups also work your back, legs, and buttocks, providing a full body workout.
3. To perform push-ups, you do not need additional equipment. Alternatively, you can do this exercise both at home and on the street. Are you on vacation? Don't have access to a gym? No problem, push-ups can be done anywhere you can find a small square of space.
4. Push-ups help strengthen muscle corset . This will not only bring you closer to a 6-pack abs, but will also be a good preventative for back pain and will also help improve your posture.

5. Push-ups are very variable exercise. A wide arm position engages the shoulder muscles, while a narrow arm position engages the triceps. You can get a great upper body workout using just your own weight.
6. The ability to do push-ups correctly will be useful to you not only in strength training, but also in yoga, Pilates, callanetics, and plyometric programs. Push-ups are one of the main exercises with your own body weight.
7. Push-ups develop muscle strength and elasticity shoulders. Provided the correct technique is followed, this is the prevention of injuries to the shoulder joints, which are most vulnerable to exercisers.
8. Large quantity modifications (from the simplest to the super-complex) makes push-ups a universal exercise that is suitable for both beginners and advanced. This means you'll always have a productive workout, no matter your strength or experience level.

Harm of push-ups and contraindications for exercise
Despite the many benefits and benefits of push-ups for developing the body and improving strength training, push-ups can cause damage. harm to your body. During push-ups, the joints of the shoulders, elbows, and wrists are involved in the work, so if you have a history of injuries or problems with the joints, then push-ups should not be performed. Injuring joints while performing push-ups is not uncommon, especially if you do not follow the correct technique.
Contraindications for performing push-ups:
- Arthrosis, arthritis and other joint problems
- Injuries to shoulders, arms, wrists
- Spinal problems
- Lumbar lordosis
- Large excess weight
Be sure to follow proper technique when performing push-ups. We always recommend warm up your hands, elbows and shoulders before doing push-ups, performing circular movements with your hands in one direction and the other.

10 features of doing push-ups that are important to know about
1. The closer you place your hands while doing push-ups, the more your triceps work. The further you space it, the more your shoulders are involved in the work.
2. If you want to make push-ups easier, rest your hands on the bench or go down on your knees.
3. If you want, on the contrary, make push-ups more difficult, then place your feet on a bench or other elevated surface. Moreover, the higher your legs are, the more difficult it will be to do push-ups.
4. To increase the amplitude and efficiency of push-ups, you can perform them on special racks: push-up supports. In this case, the body will drop lower and the muscles will work even harder.

5. Push-up supports not only allow you to thoroughly pump the muscles of the chest, shoulders and triceps, but also significantly reduce the risk of wrist injuries.
6. If you do not have special supports, then you can do push-ups on dumbbells, this will also help reduce the load on your hands.

7. Before push-ups, try to do gymnastics for the joints of your shoulders, elbows and hands (circular movements with shoulders, arms and hands).
8. If you have weak wrists, use elastic bandages, they will reduce the load on the joints. This is especially true if you plan to do plyometric push-ups (discussed below).
9. To increase muscle mass, try to perform push-ups for a low number of repetitions, using complex modifications or additional weight. But to lose weight, develop endurance and develop functional training, you can move towards increasing the number of repetitions.
10. The standard description of exercises is allowed make some adjustments , which are due to different anatomical structure and flexibility. Determine the position of your palms that will ensure comfortable performance of push-ups.
How to learn to do push-ups from scratch: a ready-made plan
It's okay if you've never done push-ups before or had a long break from fitness and have lost this skill. Anyone can learn to do push-ups, regardless of gender or age! Of course, you'll need regular practice, but learning how to do push-ups is not as difficult as, say, doing pull-ups.
The most important thing to remember if you want to learn how to do push-ups efficiently and effectively: you must always follow correct technique from the very first repetition of the exercise. Even if you start with simple variations of the exercise, remember to use proper form and technique.
In order to start doing push-ups from scratch, we offer you a step-by-step program for beginners. Thanks to this scheme, everyone can learn push-ups!

A ready-made diagram of how to learn to do push-ups for beginners
In order to learn how to do push-ups, you will need to master 3 stages of push-ups . You need to exercise daily, you need to perform 3-4 approaches with the maximum number of repetitions in each approach. Perhaps your first attempts will not allow you to do more than 5-10 push-ups, but every day you will progress.
If you feel like you haven't made the progress you want at the end of the week, then continue doing the same push-up modification for another week. It is better to move to the next difficulty level after you can do push-ups 30-40 times without stopping. Don't forget about the correct push-up technique!
Week 1: Wall push-ups
Wall push-ups are an exercise that everyone can do. These vertical push-ups are a great introductory exercise that will help you master push-ups later on.

Week 2: Knee push-ups
The next level is knee push-ups. Please note that even when doing push-ups from the knees, the body should maintain a straight line, the pelvis should not go up.

Week 3: Push-ups
Once you have mastered knee push-ups, you can move on to bench push-ups. Attention, there is a nuance here. The higher the bench, the easier it will be for you to do push-ups. Therefore, you can change the height of the surface, thereby slowly preparing yourself for push-ups from the floor.

Week 4: Push-ups
After three weeks of regular push-ups, your body will be ready for push-ups. Remember that it is better to do fewer repetitions, but with full amplitude (elbows should bend 90 degrees).


How many times should you do push-ups: ready-made push-up patterns
We emphasize once again that you should never chase quantity while neglecting quality. In addition, you don't always need to strive for more repetitions. How many times you need to do push-ups depends on your goals.
So, there are several possible situations:
1. If you want pump up and increase muscle mass in volume, then move towards increasing weight and complexity. For example, use barbell plates or elevate your feet on a bench. Training scheme: 10-12 repetitions of 3-4 approaches.

2. If you want lose weight and get relief, then move towards increasing the number of repetitions. Perform 15-25 repetitions in 5 sets. You can increase the total number of push-ups weekly or move on to more complex modifications.
3. If you want develop endurance and functional strength, then also move towards increasing the number of repetitions and choosing more complex modifications of floor push-ups, including plyometrics.
An example of a ready-made push-up scheme for increasing endurance and losing weight:

An example of a ready-made push-up scheme to increase muscle mass:

21 variations of push-ups in GIFs!
We offer you a unique selection: 21 variations of push-ups in visual GIF animations! The proposed exercise modifications are divided into 3 levels of difficulty. Please note that the complexity of the exercise is often determined by individual characteristics and specific training experience, so the gradation is not universal.
Thanks to the YouTube channel for the gifs Luka Hocevar.
Push-ups on the floor: difficulty level 1
1. Wide Push up

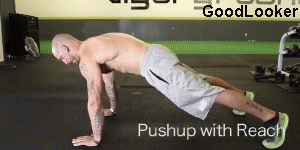
2. Push up with Reach
3. Knee Tap Push up

4. Shoulder Tap Push up

5. Triangular push-ups (Diamond Push up)
Push-ups are perhaps one of the most effective and common functional exercises among athletes. It has gained well-deserved popularity in fitness, bodybuilding, martial arts and, of course, crossfit. What can I say - in absolutely every sports discipline there is more than one effective push-up program, thanks to which you can quickly and without extreme effort achieve serious progress in the development of your own body. Considering what muscles work when pushing up from the floor, it is fair to note that this exercise not only strengthens the elbow ligaments, tendons, loads the chest and triceps, but also has a positive effect on the development of strength and speed of punching and elbowing.
Push-up program for a month
Once you have mastered the correct push-up technique, you should begin to gradually try to increase your result. Not a single athlete in the world is able to perform a hundred push-ups in one approach in the first training session. The program presented below is designed for 30 days, with one day of rest between workouts. This training method will help beginning athletes quickly achieve decent results.
You can also download this program from .
GTO standards for push-ups
Push-ups are a mandatory part of the state GTO program. For men and women, the number of push-ups is, of course, different. The difference in the number of repetitions also varies depending on the age group of the athlete. Each badge has different standards. The lower table contains the current GTO standards for push-ups.
Men
Women
| Age | Number of repetitions per: | ||
| Bronze badge | Silver badge | Gold badge | |
| 6-8 | 4 | 5 | 11 |
| 9-10 | 5 | 7 | 12 |
| 11-12 | 7 | 8 | 14 |
| 13-15 | 7 | 9 | 15 |
| 16-17 | 9 | 10 | 16 |
| 18-24 | 10 | 12 | 14 |
| 25-29 | 10 | 12 | 14 |
| 30-34 | 6 | 8 | 12 |
| 35-39 | 6 | 8 | 12 |
| For women over 40 years of age, there is a single standard; there is no differentiation by level of training. | |||
| 40-44 | 12 | ||
| 45-49 | 10 | ||
| 50-54 | 8 | ||
| 55-59 | 6 | ||
| 60-69 | 6 (with emphasis on the gymnastic bench) | ||
| 70+ | 5 (with emphasis on the chair seat) | ||
Crossfit complexes with push-ups
Push-ups are the basis of many functional complexes aimed at developing the speed and strength qualities of the muscles of the shoulder girdle. CrossFit was originally closely associated with push-ups, as many basic movements and elements, such as burpees, are built on the basis of this exercise.
The table below shows 4 functional training programs containing push-ups, with which you can work large muscle groups in your body and improve skills such as endurance and explosiveness.
If you liked working in this mode, you can independently develop several more similar programs for yourself. For example, you can combine push-ups with and other exercises. Such a complex load will help to work out all muscle groups at once in a short time, which makes the training program extremely intense and effective.
Chances are, you've been doing some form of push-ups since your PE lessons in school, so you definitely know how to do this exercise correctly, right? Well, it's quite possible not. Evidence shows that most people are terrible at exercises that use body weight, such as push-ups. Simply put, most people simply don't know how to do push-ups. Experienced trainers note that a huge number of people make the same mistakes. Therefore, if you don’t want to be like “the majority,” you should identify your weaknesses when doing push-ups so that you can learn how to do this exercise correctly, with perfect form.
You are placing your hands incorrectly
When it comes to performing push-ups correctly, it all starts with proper hand position. Most people place their hands either too wide or too far forward. This puts undue stress on your shoulders and you don't get the full benefits of push-ups. Make sure your palms are directly under your shoulders, just slightly wider than the width of your chest. This allows you to have reliable support and not overexert your shoulders during the exercise.
You allow your elbows to move in any direction

This is the most common consequence of placing your hands incorrectly. Additionally, many people believe the myth that your body should be in a "T" shape because your arms should be at a 90-degree angle to your body. This also puts unwanted stress on your shoulders. You want to position your hands correctly, making sure your wrists are neither facing in nor out, but straight, and your middle finger is parallel to your body. Your elbows should be no more than 60 degrees away from your body so that your body takes on an arrow shape rather than a T.
You lower your head and arch your neck

Many people are so absorbed in doing push-ups that they forget that one of the most important elements of this exercise is maintaining a straight back. This leads to a large number of mistakes, one of the most common of which is lowering the head. People forget that the neck is part of the spine, and so when they start to feel the weight of this exercise, the straight neck is the first to disappear. In addition, many people lower their head so that they feel they are closer to the floor than they actually are. Unfortunately, this only unnecessarily strains the muscles in your neck without providing any benefit to the rest of the muscles. Therefore, you should try to keep your neck in a neutral position, looking straight at the floor without looking up.
You let your back sag

As your neck drops between your arms, your lower back is next to sag. This is an inevitable violation of the correct execution of the exercise by those people who do not have enough strength to perform a regular push-up. In particular, we are talking about weak abdominal muscles. If you don't pay close attention to your form, it can lead to lower back pain. Instead of doing more incorrect push-ups, focus on doing fewer push-ups while ensuring proper form.
You lift your hips up

A slightly less common mistake when performing push-ups is the tendency to lift your hips upward. This is also an attempt to cheat the system, since this movement reduces the load on the abdominals, making the exercise easier, but it is less likely to lead to injury or back pain compared to the previous mistake. If you try to cheat the system, then you are only cheating yourself and simply missing out on the opportunity to work on your abs.
You don't go through the motions until the very end.

This is one of the most common mistakes. People don't do full pushups. They simply do light push-ups without even touching the floor, while pretending to do everything fully. But this is far from true. People deceive themselves first of all when they think that slight bending and straightening of the elbows in the plank is a push-up. This is not that kind of exercise. In fact, strength and endurance are increased exclusively by full push-ups, slow movements along a full trajectory all the way to the floor.
You're doing push-ups too fast

The push-ups described above are often accompanied by increased speed. People believe that if they use as much momentum as possible to do a few quick push-ups, it will compensate for errors in form. This tendency causes many people to perform push-ups incorrectly. People simply forget about technology, and it is from this moment that serious problems begin. To break this bad habit, focus on controlling your body and focusing on quality rather than quantity.
Do you cross your legs when you modify pushups?

If you modify your push-ups by doing, for example, incline push-ups or knee push-ups, you can achieve much more impressive results. However, if you cross your legs when doing push-ups on your knees, you may want to stop doing so. Crossing your legs while sitting is not ergonomic, so why then do you think crossing your legs while doing push-ups is a good idea? The best way to perform push-ups on your knees is to keep your legs straight and your toes touching the floor.
You are not using your abs and shoulders one hundred percent

Everyone knows that push-ups can strengthen your chest and triceps, but if that's all you focus on, you're underestimating push-ups and also increasing your chances of injury. Push-ups work virtually all of your front muscles, from your quads and abs to your shoulders and chest, and also engage your back and glutes to stabilize your body as you perform the exercise. You should also make sure that all the muscles of the body are tense and that no muscle group remains unused.
You're holding your breath

The last, but no less important mistake is common to almost all complex exercises. When people begin to have difficulty performing, they hold their breath and try to overcome the difficult movement. If you are already finishing a set and have used all the resources in your body, then there is nothing wrong with holding your breath. But if you do this for the entire set, you're simply approaching the basic physiology of the exercise incorrectly. Your body needs a steady flow of oxygen to support your movements, and proper breathing can even allow you to perform better during an exercise.
Benefits of doing it right

Yes, push-ups are not the easiest exercise, but once you perfect the form, you will quickly begin to strengthen your chest, shoulders, and triceps, all with one exercise that requires no equipment. Moreover, the abdominal muscles are also strengthened, since you need to constantly maintain an ideal plank throughout the entire set. As tempting as it is to relax and forget about form, it's better to do fewer reps with perfect form than more reps with poor form.
Push-ups are considered one of the basic exercises designed to build a strong muscle and strength foundation for the upper body using only your own body weight. They are part of the physical training of military personnel and are performed even by the most seasoned athletes. Push-ups are quite easy to learn and do not require any expensive equipment. Another plus is the variability of this exercise, shifting the emphasis of the load from one muscle group to another. So what muscles swing when pushing up from the floor and what types exist? Let's try to figure it out further.
Several muscle groups of the torso work simultaneously during push-ups:
- breast
- triceps
- shoulders
- press
- serratus anterior muscle
Push-ups are performed in a lying position, which also helps develop correct posture.
The pectoralis major muscle is without a doubt the most frequently trained muscle group in bodybuilding and fitness. It is primarily responsible for the pushing actions of the upper body. When you go down and up during push-ups, it does most of the work. Unfortunately, in modern times, these muscles are given much less opportunity to contribute to our daily lives, which means they are in an atrophied state in most people. That is why they have enormous potential for both strength and size growth.
During push-ups, the triceps also work. This muscle, depending on the width of the arms, takes more or less load. Occupies 2/3 of the volume of the total mass of the arms and is responsible for their extension.
They consist of three parts - front, middle and back. The greatest stimulation is obtained during seated presses, and push-ups occupy the third place in terms of load received (front part). Despite the fact that they are weaker than the chest, they help lift the body.
Serratus anterior muscle
Give an aesthetic and finished look to your torso. Serve to stabilize and move the scapula forward and outward. Located under the arms in the back of the pectoral muscles. Activate and strengthen with push-ups.
The abdominal muscles also pump during push-ups. Helps you stay upright in a lying position. It is important to remember that in order to see six-pack abs, your body fat level must be low. This means you should still pay more attention to your diet.
The neck sways slightly. To perform horizontal push-ups correctly, it is important to look in front of you rather than down.
As for other muscle groups, for example, the biceps and back - no matter what anyone says or writes, but they are practically not involved (with the exception of only a slight pressure exerted by your own body when lowering), and it is impossible to pump them up with push-ups. To do this, use pull-ups or pull-ups on the bar.
Types of push-ups
There are many types of push-ups, but the most common ones are:
- narrow
- wide
- on one hand
- with a downward slope
- with an upward slope
Wide push-ups
An easier version of the exercise, since the amplitude of movement up and down is noticeably reduced due to the wide stance of the arms. Allows you to move your elbows further apart and use your triceps to a lesser extent. The outer part of the pectoral muscles works to the maximum, giving them volume and fullness.
Narrow push-ups
Here the opposite is true - the elbows are pressed closer to the body, shifting the emphasis to the triceps brachii muscle. The breasts receive less stimulation compared to the previous option. If your goal is to pump up your triceps, then it is better to use another exercise - triceps push-ups.
One-arm push-ups
An incredibly energy-intensive and complex exercise in which the working muscles are not only the chest and triceps, but also almost the entire abdominal press, stabilizing your body during the approach. Develops strength indicators well.
Incline push-ups
Another method for experienced athletes, which maximally includes the upper bundle of the pectoral muscle in the work, forcing you to lift an even larger percentage of your own body. The higher the legs are placed on a hill, the more difficult the exercise will be and the more stimulation it will provide. The abdominal and oblique muscles, as well as the erector spinae muscle, also work, stabilizing the body during execution.
Push-ups not only help you strengthen your upper body, but also make your middle stronger. It engages the stabilizing muscles of your core by combining upper body tension with a plank. This is essentially one of the best and easiest exercises for the midsection.
According to The Post Game:
“Push-ups are a higher value bar. Not only are you strengthening your abdominal muscles by holding them while gravity tries to pull your hips toward the ground, but you are also strengthening the muscles in your upper body: chest, shoulders, and triceps.”
Take a look at the video above (English only) to learn how to do the perfect push-up.
Indeed, push-ups don't just make your upper body stronger, they also train your abs—if you do them correctly. Typically, videos attached to articles are helpful, but this video is really important because Darin actually demonstrates the techniques described below, and as has been said for almost a hundred years:
"A picture is worth a thousand words"
In this video, Darin Steen demonstrates the perfect push-up and shows three basic strategies for creating great abs:
- Correct form
- Alternating techniques to target different muscle groups
- Gradual exercises so you can get stronger and gain muscle mass
Proper form is critical to preventing injury and gaining benefits.
Common mistakes most people make when performing push-ups include:
- Doing the exercise too quickly
- Using only partial range of motion
First, slow down and use a three-second muscle contraction. Try to really feel the muscle groups you are targeting and go through a full range of motion; starting from the bottom and working your way up.
Pay special attention to the alignment of your elbows. The ideal angle of the elbows at the sides is about 45 degrees. This allows you to effectively work the chest muscles.
- Keep your body tight and straight in a plank position.
- Elbows at a 45 degree angle to the sides
- Inhale as you go down
- Lower your body all the way, allowing your chest to gently touch the floor
- Exhale as you rise
Methods of targeting different muscle groups
Push-ups are traditionally used to work the chest muscles, but by varying your technique, you can work different muscle groups, including your abs.
But first you need to understand the structure of the abdominal wall.
Your transverse abdomen (TVA) is like a membrane that holds your insides in place. Above that are the internal and external obliques, and higher up, under your skin, are the abs - the rectus abdominis. You also have lower pelvic muscles that are responsible for sexual function and urine production at the lower abdominal wall. At the top is the diaphragm.
The technique that Darin demonstrates allows you to focus and really feel your abdominal muscles working while you do the push-up.
Here are two key points:
- In a plank, pull your belly button in. Your belly button is attached to the transverse abdominis muscle, that sheath that supports your insides and gives your spine and vertebrae a nice waist type of support. Thus, by retracting it, you begin to contract the deep internal transverse abdominal muscle.
- Then do a Kegel exercise. This term may be more familiar to women than to men. Kegel exercises are performed by drawing in the lower pelvic muscles and holding them high and tight. For men who are not familiar with this term, it is similar to trying to stop urinating midstream. This squeeze will allow you to feel and focus on your abdominal muscles.
If you want to work your abdominal muscles and turn them into six-pack abs, pull your chin down toward your toes while you focus on squeezing your belly button.
These techniques are very effective and will help you work the deep inner core muscles that lay the foundation for your six-pack abs. Keep in mind, however, that in order to really get a six-pack, you need to lose fat.
The mass fraction of fat in men should be approximately six percent, and in women about nine percent, in order to achieve classic cubes.
How to gradually become stronger and build muscle
Using progressive exercises can help you focus on the techniques described above while stimulating your muscles in different ways.
You probably know that you shouldn't do the same exercises all the time. You need to "tangle" the muscle to keep it growing. Darin demonstrates several unique techniques to achieve this, no matter what level you're starting at.
How do you know when it's time to move to the next level?
Once you can do 12, 15, or 18 reps for two or three exercises, move on to the next level or technique.
First, if you're just starting to do push-ups, you can start with your knees on the floor. Press your heels into your buttocks and keep your body straight. In this position, you can still retract your belly button and do Kegel exercises to target the deeper abdominal muscles.
Remember to do the exercise slowly and use a full range of motion, allowing your chest to gently touch the floor. By bringing your elbows closer to your sides, you can focus more on your chest muscles.
Once you can comfortably perform about a dozen push-ups in this manner, continue with a regular push-up technique, keeping your legs straight and balancing on your toes.
A more advanced technique that will improve the strength and grip of your hands is to do push-ups on your fingertips.
Another advanced method is push-ups from an unstable surface. Two medicine balls work well for this. Place your palms on the top of the ball and push off from it.
The next step is to raise your legs higher than your arms. This will place additional weight on your chest and muscles. Find a bench, chair, or other flat surface that is 12 to 16 inches high, place your feet on it, and perform a push-up.
If at any point you find that push-ups are causing pain in your wrists, simply use a pair of light dumbbells. Gripping a dumbbell instead of placing your palm on the floor will keep your wrist nice and level, preventing painful strain.
Finally, here's a very advanced technique called the dumbbell push-up. This will help you pump up your abs perfectly!
Darin uses 20-pound dumbbells in the demonstration, but you can start with a weight appropriate for your current strength and fitness level and gradually move to heavier weights as you progress. Place the dumbbells at a 45 degree angle; pull your navel in; contract your lower pelvic muscles (Kegel exercise) and inhale as you lower your upper body to the floor.
Exhale as you rise, and once your arms are straight, pull the right dumbbell toward your chest. On the next push-up, pull up the left one.
This method will work your abs from all angles and also specifically engage the deep muscles of your torso.
Plyometric push-ups - Mini-exercise “Sprint 8”
To further stimulate your core, try plyometric push-ups. Plyometrics are fast, sharp types of movement. To do a plyometric push-up, once your chest hits the floor, hold the position and breathe for about three seconds, then sharp stand up straight.
Another method, called the three-minute push-up, is extremely difficult but produces fantastic results.
Simply put, how many push-ups can you do in three minutes?
You must have good technique, good form and strategy. If you push up as hard as you can, you'll lose energy and probably won't last three minutes. So do push-ups at a pace that is about 80 percent of your total capacity, and when you can't continue, rest for 20 to 30 seconds; stretch and then resume the exercise.
The last technique is super advanced and works the shoulders, triceps and core - the handstand push-up.
While facing a wall, place your arms at a 45-degree angle, approximately one to two arm lengths away from the wall. Stand on your hands. You can use a wall to stabilize you while doing push-ups. Inhale as you lower yourself to the floor and exhale as you push yourself up.
Again, I recommend that you watch the videos to really understand how to perform the exercise with proper form and technique before trying them yourself. This will definitely allow you to avoid wasting time and effort on ineffective equipment.