What types of sticks are there?
You can separate poles for Nordic walking and for trail running (skyrunning), but this division will be quite arbitrary, since often the only difference between them will be in weight. Some trail runners (especially skyrunners in the Vertical Kilometer ® discipline), for example, use non-folding ski poles in races.
- Nordic walking poles are usually the simplest, cheapest and heaviest.
- Poles for trail running (skyrunning) are lighter and therefore more expensive.
It's quite simple: the lighter the stick, the more expensive it is. Aluminum poles generally weigh 250-350 grams per pole, while the best carbon models offer weights between 150-200 grams. That, in general, is the whole difference. But when it comes to a long, multi-hour race, then every hundred grams of excess weight matters a lot.
There are sticks folding And not folding. Non-folding poles are mainly used for Nordic walking.
Folding ones are divided into two types:
- telescopic, in which structural elements, when folded, are hidden one into another according to the principle of a system of retractable tubes entering one another (pictured above);
- folding, in which the structural elements are folded like a folding meter (pictured below).

The mechanisms for fixing the elements of the stick also differ.
For telescopic poles, this is either a screw-on fixation mechanism or a clip-on clamp. Both mechanisms work very reliably and the choice depends only on personal preference.
For folding poles, the folding and unfolding mechanism is based on the use of a flexible cable running inside the pole. The mechanism is simple, reliable, allowing you to fold and unfold the stick within literally seconds.
Poles are made primarily from either aluminum or, more expensive models, carbon, or a combination of these two materials. The material of the handles can be completely different (plastic, rubber, rubber, etc.), as well as their shape and length, even using natural materials, for example, balsa wood, so that the hand does not sweat and does not slip.
All poles are equipped with straps (lanyard), which allow you to more securely fix the pole in your hand. Most often, the lanyards are removable. We would strongly not recommended use a stick without a lanyard or without fixing the lanyard on the hand. The fact is that the tips of the sticks are often made of hard alloys (pictured below), they are very sharp and are practically weapons. With such a tip you can easily, like a spear, pierce anything (even yourself when falling on a stick). That is why, with such stick tips, you can do not allow them to be carried into the cabin as hand luggage.

ALWAYS USE YOUR BELTS FOR YOUR OWN SAFETY!
A stick with a strap on your hand will never roll down the slope and will not be left far behind if it suddenly gets stuck in a crevice during the descent. You will never lose it if you wear a belt on your hand.
Some lanyards have an ergonomic shape and are tightened on the wrist using a Velcro fastener, which operates on the principle of a burdock. This is quite convenient, as the hand and forearm relax, and it saves energy. But over long distances you have to often unfasten and fasten this “Velcro” and this takes a lot of effort, and most importantly, the “Velcro” constantly strives to stick where it is not needed. This becomes terribly annoying after 10-12 hours of movement. Therefore, many manufacturers began to use various designs for quickly attaching belts. They are a half-glove, constantly worn on the hand, and a quickly removable carabiner, such as, for example, sticks from a German company Leki(photo below). This glove also protects the palm when falling or leaning on stones.

The main large manufacturers of trekking poles are: Black Diamond, Leki, Dynafit, Raidlight, and there are also Guidetti, CAMP, Swix, Salewa, Cober, etc. There are a huge number of manufacturers.
How to choose poles according to height?
If we are talking about telescopic poles, then everything is simple - the height of the pole is adjustable, and with practice you will experimentally choose a working height that is convenient for you. If we are talking about folding poles, then most often these models are not adjustable in height, although Leki has now released adjustable folding poles, in which the adjustable section is hidden in the handle.
Manufacturers sell folding poles in increments of 5 centimeters. But in any case, a table on the seller’s or manufacturer’s website will come to your aid, helping you choose the height of the poles depending on your height.

If we are talking about buying the first poles in your sports life, then we would recommend buying telescopic poles in order to empirically select the length that is convenient for you during use. For example, for the author of this article, with a height of 180, the manufacturer recommends poles with a height of 125 centimeters, but for me a working height of 130 centimeters is more convenient. I ran with different poles of different heights and came to the conclusion that it is at a height of 130 centimeters that I most comfortably walk uphill and use energy optimally.
As for changing the length of the poles while moving along the distance, depending on the ascent or descent and their angles, experience shows that it is better not to change the length of the poles. From our point of view, there is no point in this, just an extra waste of energy at a distance. The angles of mountain slopes are not constant, so why change the length of the poles every time this angle changes? Also, in our opinion, you should not try to change the length of the right-left pole when traversing a slope. All this is unnecessary and unnecessary waste of time and effort.

Transporting poles.
On long races it is impossible to carry poles in your hands all the time, and on some trails of increased mountain difficulty you often have to walk using climbing rails, which is simply life-threatening if your hands are full. It’s best to attach them to your backpack in places where you don’t need poles or get in the way. For example, Salomon backpacks have standard and convenient mounts for both telescopic (photo above) and folding poles (photo below).

Or you can use multifunctional belts, for example, like the ARCH MAX Trail Pro, to attach folding poles. The video below shows the mounting process.
Another feature of folding poles, at least some models and manufacturers, is the vibration of such poles when moving. They are more mobile when leaning on them due to less reliable fixation of the segments than telescopic poles. Expensive and modern models use the Antishock system, which avoids such an unpleasant phenomenon, but all this undoubtedly increases the cost of the poles.
Where to use sticks?
Of course, poles are mainly used on mountain trails with a lot of elevation gain. But sometimes poles are very useful on “smooth” trails with little climbing, but for example a lot of dirt. Using poles helps relieve stress on your legs and, most importantly, your back, saves strength and helps with balancing on unstable surfaces. You have to pay for this by increasing your pulse rate due to increased load on your arms and excess weight. Whether you use poles or not is your personal choice..
Advantages and disadvantages of using trekking poles.
ADVANTAGES:
The use of poles allows you to give the body a more even position and thereby, by opening the chest, improve breathing, since the muscles of the diaphragm will work more smoothly. Also, using sticks improves blood circulation in the limbs. The return of venous blood relieves swelling of the hands and fingers and promotes better thermoregulation.
When walking on inclines, the poles act as shock absorbers and ease the stress on your ankles, knees, hips and spine... This reduces the risk of injury in the short and long term. When climbing climbs, using poles reduces the load on the quadriceps and hamstrings, since we transfer part of the body weight to the poles, leaning on them. This will keep your feet fresher if you use poles.
But it should be noted that using poles increases your heart rate (by an average of 10%) and increases calorie consumption. This is good if your goal is to burn more calories and lose weight, but bad if you are running in competition. On the other hand, the slight increase in heart rate and energy expenditure is offset by a decrease in overall fatigue and a reduced risk of injury.
On long trails, as opposed to short ones, it is more important to maintain “freshness” for as long as possible than to regulate your heart rate, and therefore the use of poles is justified. Poles also help you balance, which means you feel more confident. Sticks help overcome obstacles such as mud, snow, unstable and large stones, etc.; ford streams and rivers, and in extreme cases, protect yourself from an animal or help another runner.
FLAWS:
First of all, these are additional financial expenses. The next item is the extra weight that you need to carry with you. Although modern carbon poles weigh no more than 500 grams per pair, during competitions every extra gram counts. Sticks also occupy your hands, making it difficult to take water and food.
You also need to understand that using poles requires mastering, although quite simple, the technique of running with them. In the video above, Russian Skyrunning Champions show movement techniques using trekking poles, and here is a short accompanying comment from Dmitry:
"The eternal question is whether to run with poles or not? Before you ask yourself such a question, you need to buy good light poles and learn how to run with them. The longer the distance and the greater the climb, the more poles will help you. At the beginning of the race, poles will help you keep your legs fresher , and in the second half I will really help your tired legs. If you have problems with coordination, are overweight or even just have large muscles, for example, like me, I recommend training with poles and running mountain races with poles too.
Try to use different walking and running techniques with poles, alternate. If you train in places where there are no mountains, walk with poles on a treadmill at maximum incline, up stairs, or just do exercises using poles. Until last year I didn’t use poles, now I run all races with them, last year I tried carbon Black Diamond ones, the poles lasted me for 3 races, they broke quickly. After that, I started running with Camp Xenon 4 poles, I’ve had them safe and sound for a whole year now.”
If you've never used poles before, it's best to practice running with them at least a few times (mounting them on a backpack, feeding with them, getting up and down techniques) before taking them to the competition. Effective training exercises using trekking poles can be seen in the running school video Trail Running School Dmitry and Ekaterina Mityaev. Another set of exercises with trekking poles can be seen at LINK.
Besides, you need to carefully read the race regulations . In some races (for example, the famous one) the use of sticks forbidden, and in those where it is allowed, in the vast majority of cases, it is necessary to go with them the entire distance from start to finish. You cannot use them only on the climb, and then leave them and continue on without them. You also need to be more attentive towards other runners and not injure the person running next to you with a stick.
It can be stated that there is no specific trend in the use of poles among professional or amateur runners. Professional athletes, just like amateurs, some use poles all the time, some from time to time, and some never. You can understand whether you need poles or not, whether they help you or hinder you, only by experience by running a sufficient number of races with them and without them.
First of all, it is necessary to clarify what is meant by the term “tracking”. In short - hiking. The term itself comes from the English word “trekking”, which literally means “hike”. So trekking poles will be useful for those who are interested in hiking.
What for?
This question will inevitably arise in the reader's mind. And it will be quite reasonable. Tourists have been walking for years without any walking sticks. Is it really impossible to do without them?
It's possible to get by. However, poles provide several important advantages, the main one of which is reducing the load on the long-suffering human spine. As you know, a tourist carries a backpack on his back. A heavy backpack does not at all contribute to evenly distributing the load on the spine. Sticks also help reduce the stress on your knees. This is especially true if there is a long climb ahead of the tourist.

In addition, poles help maintain balance. Trekking involves traveling over rough terrain. And in such terrain, no one can guarantee that a tourist will not fall into some hole that he did not notice. Using a stick, you can check the place where you are supposed to put your foot next. And this simple action will help you avoid many troubles.
All these things make a trekking pole a necessary and useful tool. But these sticks are different. And in order for the poles to serve the tourist faithfully for a long time, when choosing them you need to pay attention to some things.

The first thing to consider when choosing a set of poles is weight. You need to take your own weight and add to it the maximum weight of cargo that you can carry in your backpack. If the total weight exceeds 100 kg, it is better to refuse light trekking poles and pay attention to heavy models. Also, when choosing poles, it is necessary to take into account the height of the traveler. If your height exceeds 180 cm, you should choose poles whose length is 130 cm. Even if the choice turns out to be wrong, the poles can be adjusted in height. So they can be configured at any time to suit your needs. If you stand on a flat surface and place a stick next to it, then the handle of a stick that is correctly selected for the height should be 7 cm below the armpit.
Poles usually have a telescopic design and consist of several sections. This allows them to be folded. But the handles of the sticks can be different. They are made from both rubber and polymer materials. If the handle is rubber, then it will be heavier than the polymer one. In addition, rubber handles have another drawback: they make your hands sweat quickly. So when choosing poles with rubber handles, it makes sense to think about purchasing hiking gloves.
As for polymer handles, they are more comfortable than rubber ones. Firstly, they are lighter. And secondly, they contain balsa wood shavings, which makes them porous, preventing your hands from sweating during long walking.
.jpg)
You should also take a close look at the locking mechanism of trekking poles. The stick sections are connected in different ways. They can simply screw into one another. Or they can be connected using a special lock, which is equipped with a small lever. This design makes it possible to change the length of the poles at any time. All you need to do to do this is move the lever and press on the stick. If you decide to choose this particular type of stick, you should pay attention to the rod inside the locking device. This rod must be steel. There are poles with a plastic shaft, but it is better to refrain from buying them, since they do not last long.
Another integral part of the stick is the tip. The best tips are made from pobedite alloy. Lower quality tips are made from ordinary steel. If the tip is made of pobedite alloy, then it looks like a small pin. Moreover, its color will be dark. Steel tips are much larger in size and have a characteristic matte shine. A stick with a pobedit tip is much more durable. However, it will also cost more.

The number of sections in a stick also varies. The stick may consist of two, three or four sections. The general rule is simple: the shorter the stick when folded, the better.
And finally, shock absorbers. They can also be part of the sticks. Whether they are needed or not depends on where exactly the trekking poles are intended to be used. If the terrain is not too rough, the presence of shock absorbers will have a beneficial effect on the condition of the wrist joints, as it will protect them from sudden shocks.
If you plan to use the poles on difficult terrain or in the mountains, it is better to avoid shock absorbers. In the mountains, springy poles can do a tourist a disservice. And instead of protecting your joints, they can cause serious injuries.
Trekking poles ( trekking poles) are special poles that make it easier to move through mountainous and hilly landscapes. 20 years ago they replaced alpenstocks, which were actively used in mountain climbing.
By removing the load from the legs, they prevent possible bruises and injuries. When passing through rocky terrain, trekking poles will help relieve some of the load from the legs and give more balance and stability to the tourist. Let's figure out how to choose trekking poles so that they help during the hike and do not create difficulties.
As additional equipment, trekking poles should definitely be chosen for any mountain climbs, because rapidly changing terrain and different step frequencies load the leg muscles much faster than when walking on flat terrain.
Check out the separate post about . Now we’ll talk about the technical characteristics, manufacturers and decide how to make the right choice so that the poles “go” for a long time and delight their owner with their durability and benefits.
How to choose trekking poles?
When considering specific models, you need to start from the following factors:
- The type of terrain and terrain in which the hikes take place.
- Traveler's maximum weight;
- Height.
The maximum benefit from using hiking poles is achieved only with the correct walking technique and when your back is straight. If, while walking, the body is tilted forward, and a heavy backpack is still hanging on the back, then lower back pain may appear, health will worsen and endurance will decrease.
When choosing poles, you should be careful about names like ultra-light (Ultralite), etc. Weight reduction is achieved by reducing characteristics in other important areas - shaft thickness, handle size, lanyard. Ultra-lightness can be achieved by designers by reducing the maximum length of the telescopic pole to 125 cm. This length will not be enough for tourists with a height of 180 cm, especially when descending from the mountains.
The ideal pole length for hiking on flat terrain should create a 90-degree angle at the elbow. If we translate into numbers, then this angle is selected multiplying growth by a factor of 0.7.

During descents, the length of trekking poles should be increased, and during ascents, reduced accordingly. How many centimeters? Everything is individual and depends on the angle of inclination and type of terrain. The main criterion is that the walking process should be comfortable and real unloading of the legs should be felt.
To select the correct length, use ours.
Trekking poles are divided into two subtypes according to the type of design, each of which has its own advantages and disadvantages:
Telescopic design
It consists of several sections of tubes of different diameters (most often 3 sections with a diameter of 14/16/18 mm), folding into each other. When folded, all parts are securely fixed with a locking mechanism. The main advantage of telescopic poles is that the length can be easily adjusted from 60 to 145 cm.

Thanks to this feature, telescopic models of trekking poles have gained wide popularity among tourists. However, there is a minus: the weight reaches 300-500 grams. In difficult mountain conditions this can be extremely inconvenient. Another drawback is the folded length is 60 cm, which is quite long compared to another popular design - corded.
Folding design (corded)

Leki Micro Vario Titanium with foldable design
The sections are folded using a special cord or plastic tube. The advantages of this design are low weight (from 250 to 350 grams) and small assembled dimensions (35-40 cm). However, they have not proven themselves well in the tourist community, since a number of models cannot change their length or adapt to the terrain.
Not all folding poles are a fixed length! For example, the Micro Vario model (pictured above) varies in length from 110 to 130 cm.
Any design deserves the right to exist and there is no point in belittling the merits of one or praising another. All modern trekking poles are of good quality and at the amateur level absolutely any design can be used. But in professional mountaineering, preference is given to telescopic models.
We have translated a short video with an overview of all the main features (be sure to subscribe to our YouTube channel):
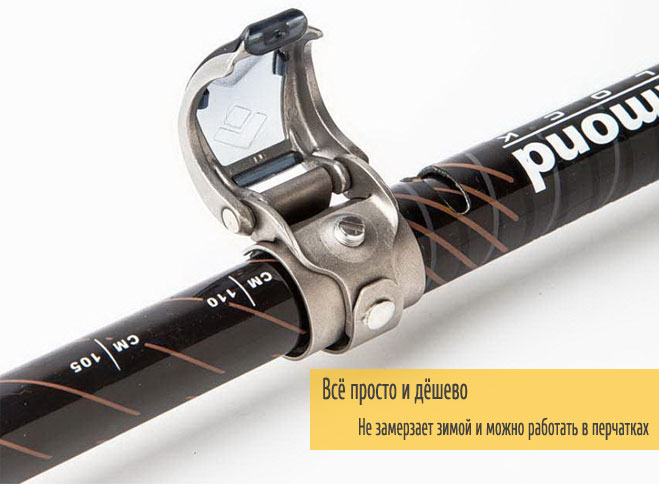
Differences between trekking poles based on the type of locking mechanism (latches)
Twist Lock
The principle of operation is very simple - at the junction of the two sections there is a collet sleeve, which, due to the rotation of the tube sections in different directions, opens or, on the contrary, compresses the latch.
A popular clamp used by almost all global manufacturers. One drawback is that in cold weather, you will have to take off your gloves to disassemble/assemble the poles, since the mechanism is located inside the tube and the outside surface is smooth.
Many manufacturers are trying in every possible way to improve this mechanism. For example, so that it works from half a turn (this function is present in expensive models) and does not freeze in cold weather. Today, the collet clamp is popular among amateurs and novice hikers, but the following clamp enjoys great authority among the old guard.
When using a collet clamp, be careful not to over-rotate the mechanism. If over-tightened, the fastener may break.

Twist Lock, outside view
Lever clamp
The stick sections are secured using a special lever. It sits outside, which makes it vulnerable to all sorts of damage.
If you lean heavily on the stick and create an additional lateral load, and the owner weighs more than 90 kilograms, then cheap Chinese samples can break. But this is the case with any equipment. Everything loves moderate force and careful operation!
Flick Lock Clamp
The ease of use is that you can adjust the trekking poles using the levers even while wearing gloves. They do not freeze in winter, unlike the collet system. A simpler clamp design reduces the cost of the stick itself.
This type of locking mechanism was first introduced by Black Diamond Equipment.
Picking up trekking poles in a store...
Often, sellers, wanting to earn more money, sell this product with a whole range of useful and useless accessories. Therefore, before purchasing, it is important to find out what elements the pole consists of and which of them are really necessary on a hike.
Lever
Much depends on its shape. When choosing poles, be sure to grab the handle firmly and feel how it fits in your hand. Be careful not to let your palms slip. The material also plays a big role. Natural cork and synthetic rubber (neoprene) are excellent options. The second one is a little cheaper, but not inferior in quality to the first one. Before purchasing, check to see if there are any extra seams, cuts or other manufacturing defects on the handle.
Lanyard
This is a special belt (lace) that allows the hand not to jump off the handle. The warm grip helps you hold the stick and relieves tension from your hand. However, if you fall, if you do not have time to remove your hand, there is a possibility of dislocating or breaking your arm.
Make sure that the fabric is dense, does not stretch, and fits well to the skin. All modern manufacturers have almost the same lanyards, so this attribute is not particularly important, like the material of the tube itself and the handle.
Tips
They are selected depending on the type of terrain where the expedition or hike takes place. There is one fundamental rule: the tip must be made of tungsten carbide or other durable alloy, which will not break under heavy loads.
There are rubber pads for the tips: round (for walking on stones) and shoe-shaped (for asphalt). They also have similar pads; they allow you to keep the tip from deformation after hitting stones, asphalt and other hard surfaces.
Rings
The size and shape of the ring are selected depending on the time of year and type of landscape. It is customary to roughly divide into “summer” and “winter”. The first (with a small diameter) are suitable for hard and relatively soft soil (clay, sand). The second ones (with a larger diameter) are needed for winter hikes in deep snow.
Anti-shock system
We will separately describe the shock-absorbing mechanism, which reduces the shock load on the hands. To date, there is no convincing evidence that this system actually works and is useful. But the price for such an option can rise significantly. However, people suffering from excess weight and joint diseases noted that anti-shock made walking a little easier.
Anti-shock will be useful during descents, but for ascents it is highly not recommended, since you will have to spend additional energy compressing the springs of the pole.
Models with anti-shock cost 2-3 thousand rubles more similar analogues, but without shock absorbers.
Review of leki khumbu anti-shock system on sticks:
The cost is affected by additional accessories. For example, a removable ice ax is attached to the handle, which helps with mountaineering. For those who like to take pictures, the ends of trekking poles can be equipped with a special mount that allows them to be used as a pole. Some specimens have devices that make it possible to build a stretcher or frame for.
To choose the right accessory for trekking poles, you need to take into account the circumstances of the future hike - what difficulties you may encounter, what its duration will be and how much you ultimately want to pay for a set of equipment.
Design length and material of manufacture
The first difficulty that novice hikers face when choosing the right trekking poles is their size, depending on their height. Below is a summary table that helps you calculate the length of poles for hiking on flat terrain:
Another important nuance is the metal or carbon fiber used to make the tubes.
Aluminum is the most popular material and cheaper than carbon fiber. Unlike Scandinavian poles, trekking poles value strength, and not the best vibration absorption characteristics that carbon exhibits.
Popular models and manufacturers
Another important question is “Which manufacturer should I give preference to?” There are enough good manufacturers today. We have collected the most popular global brands and their models.
- Leki. A German company specializing in the production of travel equipment. The products are easy and safe to use. The Micro Series line is in demand. It was the Leki company that released the first hiking poles in 1974. Price: 7000-15000 rubles.
- Masters (Italy). The company occupies a leading position in the world ranking. Popular series: light pro calu tech, hiking, expert antishock. Most of the trekking pole line is made from aircraft-grade 7075 aluminum, with handles made from cork and rubber. Prices - from 5 thousand rubles.
- Komperdell (Austria). Recommended models: carbon ultralite vario 4, carbon trailstick compact, explorer contour power lock, elevation titanal. Prices reach 3-4 thousand rubles.
- Black Diamond (USA). A brand that has proven itself among professional tourists. Well-known models: Alpine Carbon Z, Alpine Ergo Cork, Distance Carbon Z. Most of the products are equipped with anti-shock systems. Prices range from 4 to 12 thousand rubles.
- TSL Outdoor. Telescopic poles of this type are usually made of aluminum, with 2 or 3 sections. Worthy models: argentera, mercantour, aravis, lapaz, semnoz. Prices reach 9,000 rubles.
- Chinook (Canada). The following models are presented: Gravity, Venture, Trekking, Walkabout, Rockhopper (all made of aluminum). Cost from 5000 rubles;
- Outventure outdoor. Popular cheap poles, the brand operates through SportMaster stores. Prices start from 999 rubles;
- Alloy. Domestic manufacturer providing the following models: Ountain Pro Carbon, Element Alu, Mountain Alu, Hiking Hard Alu. The products are low in cost - only 2-3 thousand rubles. True, disputes sometimes arise about quality.
Popular questions
Are trekking poles suitable for Nordic walking?
Nordic walking requires special poles! It should not be confused with skiing either. This is different equipment, which has different specialization for specific specific activities.
The main thing is the shape and size of the lanyard, which is responsible for the walking technique, as well as the telescopic design of the shaft. While for Nordic walking, preference is given to poles of a fixed length.
Trekking poles - what are they and where do they come from?
What are they for and is it possible without them? Just a little history.
Review of basic designs, short analysis of advantages and disadvantages. Materials used for sticks, handles, tips. Lanyard. Antishock. Two or one?
What else do you need to know? Use cases.
Features and criteria for choosing trekking poles
.jpg)
From afar. Since ancient times, people have traveled a lot. In addition, in the early eras of the absence of Uber, low-cost airlines and trams, you had to walk a lot. The classic image of a wanderer is a bearded man in a cloak and with a staff, wandering towards a goal known to him alone. That is, holding a certain club in one’s hand to make camp life easier is quite organic for homo sapiens; we can even call it a historical trend. Having undergone a long evolution, walking to the ends of the earth evolved (or degraded) to trekking, and the staff, in turn, to the trekking pole. Let's try to define this popular type of equipment for a modern tourist-trekker-climber.
.jpg)
Definition. Currently, a trekking pole is understood as a folding (usually telescopic) pole similar to a ski pole, capable of changing its length in most designs, with a sharp tip made of steel or hard alloy, a comfortable handle equipped with an adjustable lanyard and restrictive rings of various diameters, often , with the possibility of replacement.
.jpg)
.jpg)
A little history. Back in the middle of the last century, trekking poles in their modern form were not invented. Climbers were mostly content with ice axes, replacing them with wooden poles with metal trims, and tourists with ordinary wooden poles or ski poles. With the popularization of hiking and mountaineering, it became clear that an ice ax in technically simple areas is inconvenient, just like ski and ordinary (wooden) poles for tourists. There was a demand for a stick that would provide compact dimensions when folded for transportation, would have the ability to adjust the length, have a reliable design and be light in weight.
Back in 1974, Leki launched the first model of trekking poles on the market. They consisted of three sections, internal screw locks and had a telescopic design, with the ability to adjust the length and fold. The design has become a classic and is still produced today with some modifications. Since then, the market for trekking poles has increased tenfold; they have become the default equipment for tourists. The sight of people walking with such poles even without snow or skis has long ceased to shock local residents. Let's see how justified the use of this equipment is. It is no secret that even now a significant number of tourists consider sticks to be superfluous and do without them. For greater convenience, let's divide the application conditions into two groups.
.jpg)
Read all articles about equipment:
DESIGN OF TREKKING POLKS
By folding method
The vast majority of modern trekking poles are sectional, that is, they consist of several sections for ease of folding and adjustment.
Telescopic design. It is the most common among most manufacturers. The design is based on the fact that each subsequent section is thinner than the previous one, and when folded, it is retracted into its middle. The number of sections is from 2 to 4. The optimal balance of characteristics that suits the majority of users is a design of three sections. This is an excellent compromise between compactness when folded, ease of adjustment, use, durability and manufacturability. It is easy to choose such sticks, since they occupy the lion's share of the market.
.jpg)
“Breakable”, folding design. The stick is laid out into separate sections connected by a strong cord, similar to a probe for the blind or a frame for a tent. This design is distinguished by its low weight and exceptional compactness when folded. Therefore, they are most widespread among “light walkers” and skyrunners. The disadvantages of this design are less strength and reliability, and the inability to adjust the length. For this reason, as a rule, each model is available in several length options and you must choose the size that suits you when purchasing.
.jpg)
.jpg)
Combined design. This is a symbiosis of a “breakable” stick with one telescopic knee. Thus, such a stick, being compact, can also be adjusted in length, albeit within rather small limits (usually about 15-20 cm). Being a compromise, this design has not only advantages, but also disadvantages of the two previous options. Approaching the weight of telescopic poles, it has slightly lower strength and “breakable” reliability. In addition, this option is usually very expensive.
.jpg)
.jpg)
According to the locking mechanism in the unfolded position
The functionality of a trekking pole primarily depends on the reliability and convenience of the locking lock used in this model. Although today there are only two market-leading designs that have achieved the greatest popularity, manufacturers are constantly striving to improve them by patenting their additions that increase the functionality of the lock.
Basic criteria for user evaluation of locking mechanisms
Ease of use, reliability.
The mechanism should allow you to change the length of the stick in any weather conditions, despite high humidity, frost, and heat. Manipulating the lock (opening, closing, adjusting, disassembling/assembling) should be easy for any user. It is highly desirable to be able to perform basic manipulations with one hand, wearing protective gloves.Strength and security of the castle. The lock should securely secure the stick when unfolded and prevent the stick from folding under vertical load. The user's safety may depend on this. The lock must have the simplest and most reliable design and be protected from mechanical influences (shocks, falls).
Currently, the following fixation mechanisms are most widespread:
.jpg)
Collet (internal, screw) clamp. The locking mechanism is located inside the stick; the lock is locked and opened by twisting and unscrewing the sections relative to each other. This mechanism is maximally protected from damage and is quite reliable. It also practically does not increase the dimensions of the stick and looks as laconic as possible. However, this design is rapidly losing its once monopoly position in the market due to significant shortcomings. Thus, the strength of fixation of such a structure directly depends on the force with which the stick is “twisted”. Spontaneous folding of such sticks under load is often observed. It should be noted that a properly adjusted stick from a good manufacturer with an internal clamp is superior to lever locks in terms of reliability of fixation. Why then are such clamps gradually being forced out of the market? Firstly, they are more labor-intensive (expensive) to manufacture. Secondly, ergonomics, that is, ease of use, suffers significantly. A tightly twisted stick can be very difficult to unscrew. This lock is also inconvenient to manipulate with gloves. If moisture gets into the middle of the stick, it may freeze in the cold and the lock will temporarily become unusable.
.jpg)
.jpg)
Lever (external, eccentric) clamp. It is becoming increasingly widespread, gradually replacing the screw clamp. An extremely simple design with easy adjustment has increased reliability and in most cases perfectly keeps the unfolded stick from arbitrarily folding under vertical load. Some leading manufacturers are developing their own versions of this lock, further increasing its reliability and ease of use (Black Diamond - flick lock, Leki - speed lock). The eccentric lock is easy to use with gloves and is not afraid of freezing. The main disadvantage of this design is its greater vulnerability to external influences (impacts, falls), and the possibility of uncontrolled opening of the lock upon contact with hard objects. However, in models of top brands this problem is almost completely eliminated. Also, while the fixation force of the external clamp is inferior to the internal one. Nevertheless, now on most models it is quite satisfactory, but on others it is excellent.
.jpg)
.jpg)
Combined designs. Some companies, for example, the Italian company Gable, duplicate locks on their poles for greater reliability. There is a screw clamp inside the tube and an eccentric outside. It is possible to use both or any of them. Such reinsurance may be justified in some cases.
The American company MSR, a well-known player in the outdoor market, decided to rid the trekking pole of one of its main drawbacks - the inconvenience of adjustment - and invented a revolutionary mechanism for adjusting the length of the pole “without releasing the handle.” That is, you can adjust the stick directly during movement without releasing the handle from your hand. The mechanism is mass-produced on the company's models and is patented under the name positive-locking. Despite the correction of shortcomings in subsequent generations, the design has not yet become particularly widespread.
In the budget segment, in particular by the company Quechua, several models of sticks are produced with fixed length adjustment using spring-loaded buttons that fit into the corresponding grooves on the stick. Such poles are seriously inferior in functionality to the designs discussed above and over time sometimes develop serious play, which is why they are also not widely used. Previously, a similar method of fixing sticks, but with one available position - up to the maximum length, was often used for the lower knee. Adjustment of the stick length was carried out exclusively in the upper connection. Over time, this design began to be abandoned.
By materials used
Aluminum. The most common, reliable and inexpensive material. Sticks made from it are strong, light, flexible, and repairable. But, as they say, aluminum is different from aluminum. The top grade of aluminum for poles is 7005, known to cyclists as a good material for frames. Not all manufacturers use this grade of metal. As a rule, the top models of the line with a fairly high price are made from it. The rest of the sticks are made from “simple” varieties, respectively, losing in weight and strength. There are practically no disadvantages to high-quality aluminum. For a reliable trekking pole used in serious conditions (mountains, difficult routes, heavy backpacks and “heavy” users), this is perhaps the best option. In terms of weight and specific strength, it is only slightly inferior to more expensive materials.
Light alloys. First of all, titanium. It is an alloy of titanium and aluminum. Even lighter and stronger than aluminum, but not significantly. At the same time, it is significantly more expensive. The number of models produced from this material is very limited.
Carbon (carbon fiber). The material, unprecedented in strength, is used on the most expensive models of trekking and ski poles from some well-known manufacturers. It allows you to significantly reduce the weight of the product, but significantly increases its cost. It has a number of significant disadvantages. Requires very careful handling, intolerant of sudden shock loads and impact interaction with hard, sharp surfaces. Unlike aluminum, it does not deform under heavy loads, but immediately collapses. Therefore, poles made of this material are not recommended for use in difficult and extreme conditions, as well as for people with a large body weight and wearing very heavy backpacks.
Important parts of trekking poles
Antishock. In fact, it is a spring (less often elastomeric) shock absorber located inside one of the stick sections (usually the upper one). Anti-shock is designed to reduce the shock load on the joints of the hands when walking with poles. The need for anti-shock is still a controversial topic, since neither the destructive effect of using sticks on these joints, nor, accordingly, the prevention of this effect using this design, has been fully proven. What is certain is that anti-shock adds weight and increases the complexity and cost of the design. Also, not everyone likes the feeling when using it. This is also why it is often disabled. For me personally, the justification for using anti-shock by a healthy tourist is questionable. On the other hand, it can be useful for people with excess weight and joint diseases.
.jpg)
.jpg)
Design and materials of trekking pole handles
The second most important part of the stick, characterizing its convenience/inconvenience, is, of course, the handle. It would seem - a pen and a pen, what’s special about it. However, manufacturers managed to create many variations of this seemingly simple item. What should a newbie pay attention to?
Material. The most common are rubber/plastic, cork, neoprene on a plastic base. The first option is usually presented on budget models and is suitable primarily for warm climates. In cold conditions, your hands will become desperately cold on such a handle. It has significant weight and therefore is not used in lightweight models. Plastic is also slippery, especially when wet or when you are wearing gloves. The noprene, porous handle is most comfortable, especially in the cold season. But it is more “delicate”, gets dirty more easily and is harder to clean. The functionality gap is somewhere in the middle. It makes your hands less cold than rubber, it is more durable and washes better than neoprene, and is slippery when you wear gloves or have wet hands. Choose what suits you.
Construction and form. Some handles have a rounded shape at the top, making them easy to grip with an overhand grip, like a cane. This can be useful on steep descents. If you like low poles, pay attention to models with handles inclined relative to the tube itself. In this case, your wrist will be in a comfortable position. It’s good when there is a developed anatomical protrusion at the bottom of the handle that prevents the hand from “sliding down” under heavy load. A certain exotic feature is the “cane-like” T-shaped handles. They haven't gained much popularity.
A very useful option, in my opinion. It is an elongated handle, making it possible to intercept the stick lower with convenience. This way you “shorten” the stick without changing its settings. This can be very convenient on very rough terrain, when you will not endlessly change the length of the pole using a clamp. I recommend.
.jpg)
.jpg)
Lanyard. A sling/strap attached to the handle. Can be adjusted in length. The lanyard not only “insures” the pole from loss on difficult terrain, but also, with the correct grip and adjustment, seriously relieves the hand muscles, allowing you to relax your fingers and transfer the load directly to the wrist. Very convenient on long crossings. It is advisable to choose a stick with a comfortable anatomically shaped lanyard, made of soft material, with simple and clear adjustment.
.jpg)
.png)
Restrictive rings. Located at the bottom of the lower link of the trekking pole, directly above the bayonet. They come in different diameters, removable and non-removable. The rings act as a limiter that prevents the stick from sinking deeply into the snow or getting into deep cracks in the rocks (which can lead to jamming and breakage). If you plan to use a stick at different times of the year, it is better to choose a model with removable rings. Then in summer you can use rings of small diameter, in winter - wide ones, this is convenient. You should not use a stick with the rings removed - this increases the risk of its breakage.
.jpg)
The point of a stick (tip, bayonet). When purchasing, make sure that it is not made of steel/aluminum, but of a hard tungsten carbide alloy. It is fundamentally. The carbide tip will allow the stick to be securely fixed on hard surfaces - stones, ice and will last for more than one season. In most models, worn-out tips can be replaced with new ones.
.jpg)
.jpg)
Protective caps. Protect poles during transportation. More precisely, they protect people and property from your sticks. There are also rubber tips in the shape of a sole or simply with a developed ribbed end, for using poles on asphalt. Protective caps, as a rule, are suitable for any model of poles and are freely sold.
.jpg)
.jpg)
What else do you need to know? Use Cases
What else can trekking poles be good for besides supporting you while walking?
.png)
.jpg)
Tripod. A photographic tripod is an unnecessary burden on a hike. Sometimes a trekking pole can be used as a mono tripod for photo and video shooting. Leiki is also known for the fact that on a number of models of its sticks it installs a classic screw socket for filming equipment in the handle. Using adapters, it will not be difficult to attach a connector there for an action camera that does not have its own connector for a tripod socket (some models).
Shelter frame. With the help of trekking poles, it is convenient to stretch an awning, strengthen the frame of a tent on a windy night (just do this with serious thought), and make a base for a stretcher in emergency cases. They can be used as a flagpole, an emergency element of the frame of a kayak or raft. They are also perfect for fixing (stretching) a tent in the snow. By the way, to do this, the stick can be disassembled into its component parts (telescopic) and you will have a lot of snow pegs. In general, why aren’t trekking poles and their individual parts used? It's just a matter of your intelligence and ingenuity.
Caring for sticks. Don’t be alarmed, it’s minimal, but still necessary if you want your poles to serve you for a long time and without fail. Check the adjustment of your poles from time to time - the locking mechanism should work like a clock. After the hike, take your poles apart and dry them well. Store unassembled for a long time in a special case. Or at least with loose locks.
Features of use and criteria for choosing trekking poles.
Two or one? Most people use poles in pairs. Walking with one pole is not so convenient, and in the case of a heavy backpack on difficult terrain, it is completely inconvenient. The use of sticks one at a time is justified, in my opinion, in the following cases:
- You move over simple terrain with or without a light backpack and only need additional support from time to time. That is, you take a stick “just in case.”
- You've never used trekking poles before and want to give it a try. At the same time, the thought of having two hands busy at once is unbearable for you.
- You have an injury to one of your arms.
- You often shoot handheld while moving and need to always have a free hand for the camera.
- You shared one of your sticks with someone in the group.
It should be noted that most trekking poles are sold in pairs, and it’s still not possible to buy just one pole.
Before the purchase Make up your own criteria for choosing trekking poles that are important to you. Start with the ones that are most important to you. Lock type, strength, weight, price, brand, dimensions in folded/unfolded position.
If you are a short, light girl, then obviously there is no point in buying a pole that extends up to 145-150 cm, 125 is enough for you. If your weight is about one hundred kilograms, and you are going on a hike with a heavy backpack, do not buy lightweight models of poles made from tubes of reduced diameter .
The length of the trekking pole in the unfolded position should be at least enough so that your hand, holding the pole by the handle, forms a right angle at the elbow joint. But it is desirable that there is still a small reserve for descents. Remember that on descents you need to lengthen the poles, and on ascents, on the contrary, shorten them. When unfolding the stick, pay attention to the STOP sign. They should not be neglected. For your convenience, most trekking poles have “rulers” marked in centimeters (or inches). Thanks to these markings, you can easily adjust your poles to the length you need. Just remember that to expand the stick to a length of, say, 130 cm, you need to adjust each knee to this size; there are markings on each of the retractable sections.
I don’t recommend choosing poles for yourself, the price of which causes a significant loss to the budget. Although a pole can serve for many years, first of all it is your assistant, taking on some of the difficulties during the hike. From a certain point of view, a trekking pole is a consumable item, and a breakdown should not make the owner think about suicide. If possible, try to purchase a product from a well-known brand in your region - this will make it easier to obtain accessories and spare parts.
Good luck with your choice and beautiful roads!
An article about trekking and telescopic ski poles. How to choose from a huge variety of offers exactly those that you need for certain types of activity.
First of all, let's decide what we will talk about telescope poles, although even now you can meet many tourists who walk around with old classic poles: “Why buy telescopes?”
| What is the difference between low and high price poles? First of all - quality materials and design clamps, and here you don’t need to choose the simplest option! Based on my own more than fifteen years of experience, I can definitely recommend eccentric fasteners rather than standard screw-on ones. And the company is the pioneer and clear leader in this pole segment Black Diamond, and all similar latches are now used by more and more companies, which speaks for itself. |  |
I can say that the lifespan of sticks is twists with more or less intensive use, it usually lasts 1-2 years, then problems begin, often such that they are simply irreparable in field conditions. This is not a question of the quality of materials, but design property. Therefore, no big company name guarantees the absence of problems - I had enough of these sticks and the result was the same.


The second question is how much is needed? knees? There are two, three and even four-knee models, and here you need to look at what the poles are for.
My opinion is that these are the most universal three knees, they are suitable for use all year round, trekking, freeride, and backcountry. I don’t recommend buying such poles just for skiing - they are easier to break, and the advantages of compactness are most often not used.
 BD Distance Flz Z-Poles |
Type designs BD compactor, with technology z-pole- a successful invention of recent years, they allow you to fold poles very compactly, they are a little more complicated and expensive, but lighter and great for snowboarders - such poles usually easily fit into most freeride backpacks, unlike three-knee models. But poles are still a necessary attribute for a freerider-snowboarder, and carrying them in the external mount of a backpack is not very convenient and safe, I observed many situations with the loss of poles, clinging to a tree, etc. Therefore, I highly recommend such poles mainly for snowboarders or those who ride both equipment. |
The next question is materials and their combination, and here the choice of different models makes your eyes widen. Regarding the choice between metal And carbon, in general, we can say that carbon is more expensive, lighter and sometimes stronger, but does not withstand impacts, for example, from the edge of a ski. That's why carbon poles require careful use, and are relevant for those who save every gram, for example, for long or high-speed ski touring routes and climbs, where you carry a heavy load, etc. In other cases, I prefer poles made of metal alloy, they are simpler, cheaper, more maintainable, and there is a large selection of different models.
 |
  |
Black Diamond poles have two main options - with plastic And metal latch, I've used both. I can say that I have never had any problems with the strength of the plastic, and the main advantage of iron latches is that they are flatter and look neater. I also advise you to handle plastic latches with care at temperatures below -30 degrees, and don’t forget that metal also becomes brittle in the cold.


By handle designs, there are quite a few options here, several types of rubber are used, and cork, and plastic, in general, it depends on the main purpose of the stick and for me it does not play a big role. It is convenient when a continuation is made of neoprene or rubber below the handle - if you need to quickly grab the stick lower, for example on a short traverse. This is usually typical for trekking models, well, this solution doesn’t interfere with skating either, except that it increases the weight a little.


Well, the last, important detail of the sticks is tips And rings. Keep in mind that when trekking in the mountains, the tips wear out quite quickly, and it is advisable to have spare ones. This is not so important for freeride, but blunt tips are a big hindrance if the slope is hard and quite steep, in such a situation the support on the poles must be reliable both when ascending and when descending, I have been convinced of this more than once.